Showing posts with label Deco Art Glamour Dust. Show all posts

Thursday, May 7, 2015

A Kopy Kat Here

I fell in love with Jenny Gropp's "Paper Quilting" card and IO's Open Scroll Flower Die.  I also thought, WOW, a way to use some of my DP pieces (not used since falling in love with IO's CAC stamps).  If you want to see how beautifully done cards are done, don't miss Jenny's blog!  She really is One KOOL Krafty Kat!!!  Below is how I did my CAS of her card!

CARD FRONT:
  1. Used the Open Scroll Flower Die to emboss the image 3 times on a 5.75"X4.0" piece of Laid white cardstock.
  2. Die cut the flower using 1.75"X1.75" pieces of leftover pink print DP.  Used removable Scotch tape on the top of the die cut to keep in place.  Saved leftover negative pieces for back of card and envy.
  3. Die cut leaves using 1.5"X.75" pieces of leftover green print DP.  Saved negative pieces for back of card and envy.
  4. Glued die cut petals and leaves in place on the "TOP" of "embossed images" using Glossy Accents and needle-nosed applicator.  (It looks like you would place them on the backside, but guess how I know it's the front most embossed looking image? 
  5. Used Swiss Dots embossing folder on the left side of image and then lined up with right-end row of dots to emboss the right side of image.
  6. Each layer of cardstock for the base is increased by .25" on each side. 
  7. Mounted sequins with glue dots.  Added a little glitter to the centers.  Punched the centers out of sequins and mounted on lower right.

CARD BACK & ENVY
  1. Layered the back side as shown.
  2. Glued the bottom end of each leftover flower to the corners with GA.
  3. Lined up the leftover leaves with petals and glued the furthest end.  Trimmed the leaves at the petal area and glued petals last.
  4. Added a piece of embossed swiss dots on envelope paper to the corner of the envy and then did flower and leaves like the back of card.  Added sequins there too!
I am so slow these days with Spring acting like Summer in my yard.  I am behind in hopping, but will get caught up in the next few days.  I have really missed your art!!!  Thanks for stopping by to look and share everyone!!


 Shirley
 SUPPLIES:

Wednesday, April 22, 2015

Christmas Postcard


JUSTRITE CHRISTMAS POSTCARD

Well, I am back sooner than before.... ;;) Some of you really made me feel guilty about not starting early on my Christmas cards.  Well I started this one last September before I got side tracked and finished it this week!! Below is how I did it:

CARD FRONT/BACK & ENVY:
  1. Stamped whole image twice and the holly sprig once with Golden Glitz on white cardstock.  Painted one of the whole images and the holly sprig with Twinks.  Trimmed around the watercolored whole image and the corners for the back of the card.  Trimmed around the edges of the unpainted whole image and shadow painted around the holly, mistletoe, and bell for the base.
  2. Mounted the shadow painted base on a remnant frosted tan piece of cardstock.  Turned the Twink painted image over and embossed edges with stylus on mat and then mounted over the image on the base with 3D pop-dots.
  3. Mounted a 4.25X 5.25 piece of white cardstock on the back of the front. Trimmed around the leftover edges of the corners of the painted image and mounted to the corners of the white cardstock on the back. Used a glue pen for the edges, snowflakes, and words on the front and the corners on the back.  Applied glitter.  (I keep my glitter in a plastic bowl with lid.  It has a cup so I can apply quickly.  After dry, I have a soft brush I use to sweep off extra that might be loose.)
    ELIZABETH CRAFT DESIGNS - 745 MERRY CHRISTMAS
  4. Applied Glossy Accents to the Cranberries, Mistletoe berries, and the bell 'ding'.  Applied tiny 2mm pearls to the large snowflake.
  5. Did die cut in white cardstock, painted with Garnet Red like the Cranberries, and mounted with GA.
  6. Peeled cardstock back layer off the last Cranberry image and leftover snowflake corners for the envy.  Thinner for mailing.  Added the glitter and a thin layer of Glossy Accents.
**If you are wondering about the eraser in my supplies list, I use it to erase dry Glossy Accents that might come out from beneath the edges of some of the images.  It doesn't leave any marks and the paper looks like new.

That's all for now.  I am off to take a look at what you ladies have been doing!!  Can't wait to see.  Thanks for stopping by to look and share!!


 Shirley
 SUPPLIES:

Monday, December 23, 2013

A Merry Christmas and Hinged Card Type 3

I wish you and yours a very Merry Christmas and a Happy New Year if I don't see you again before then.  It's the time of year when sometimes I want to fly away, so I picked this angel to see if I could for a little while.  I did the cardfold first.

CARDFRONT AND BASE:
  1. Cut the die cut from A2 Filigree Delight die set using a piece of card stock 1" longer than the width, and folded or scored at the 1" mark.
  2. Did an extra die cut from cardstock or text paper (you can use printer paper if it's white enough to match) to attach to the back side of my die cut cardfront.  I used cardstock and it was a little thick.  Attached it using Glossy Accents.  I had to trim a little from it before attaching the shadow left-over 1" part to the base because I used cardstock instead of text for the die cut.
  3. Cut a base twice as long for the width and the same length as your die cut.  If you look close you can see I scored it in the middle.  Added two sided tape around the edges and long one side of down the middle. 
  4. I folded it in half covering the extra 1" piece from the front. If it is a little longer than the top, after you line it up with the middle, just trim it with scissors to match the front.  Now it's ready for the images.

STAMPED IMAGES:
  1.  Stamped Hannah Davies Angel with Golden Glitz on white cardstock twice, painted with twinks, cut out one image.  Cut the arm and hair from the second image.  Embossed all from the back, mounted first image with 3D pop-dots and then mounted the hair and arm on it.
  2. Stamped CAC Mesh Circles on Neenah Solar White text paper with Memento Luxe Pistachio.  Cut another die cut from it, and then used the die to cut out the center.  The die cut was mounted on the bottom first and then the center was mounted on the inside top portion of the card.
  3. Stamped the sentiment from Round Ornaments 1 with the Pistachio in the center of the bottom part of the inside.  The ink in the photo shows up darker than it is.  Boy my pictures lately.....
EMBELLISHMENTS:
  1. The snowflakes are leftovers I had from the Small Snowflake set.  I mounted them with Glossy Accents.  Glitter and pearl stickers were applied with a Sakura Glue Pen.  The bow is Michaels ribbon.  The envelope matches the Mesh Circles and snowflakes.
This was done kind of fast so excuse the typos, etc.  A big big thank you to those of you who sent a card to the soldier.  Thanks for stopping to look and share.  Have a wonderful holiday and if you see this afterward, hope it was great too!


 Shirley


SUPPLIES:

Tuesday, November 19, 2013

Twisted Peppermint Moon

I was inspired to use this stamp by Ellen Taylor, who used it in her post HERE.  The colors on my cardfront match the bottom of the card in real life, but somehow when I took the picture it looks like different colors were used on the bottom.  Go figure!

I really like twisted easels and so do my friends.  I used to think they limited my ability to write extra if I wanted, so I started using the back side of the card for my note.  Some said they liked that so they could stand it up for others to see without sharing the personal writing.

CARD FRONT AND IMAGES:
  1. Stamped Peppermint Moon with Espresso Truffle on white cardstock twice, painted with Twinkling H2O's, cut out, embossed with stylus from the back, and mounted on Lacey Circles largest die cut from white cardstock.  Cut out extra sash and tree, painted with H2O's, embossed from the back with stylus, and mounted with 3D pop-dots on main image.
  2. Stamped two more trees from the main image, painted and trimmed (one for the easel bottom and one for the envelope).
  3. Created card front and bottom bases using the outised of  the Curved Matting Basics largest die as a stencil on white cardstock. Used as a die to get 2 red die cuts.  Stamped CAC Thick Stripes on white 8.5"X11" cardstock with SU Real Red twice along the length. 
  4. The bottom was built just like the top, only Lacey Ovals was used for the sentiment.  The sentiment from Round Ornaments was stamped with Real Red too.  The extra tree was mounted on the smallest Lacey Circles die cut.
  5. 2mm round and 5mm heart pearls, Glossy Accents for the stars, Glitter, a bow, and heart pen were added to embellish.
  6. *I've had the glue bottles you see in Supplies for nearly 6 years.  I use them for Glossy Accents and other adhesives.  They're great for small places.  **At first I thought the QuikStik would be awkward, but after using it I love it!! Thanks to you, Kitty Caracciolo. It doesn't grip it as hard as the AIG Sticky Sticks and means the Glossy Accents doesn't have to have started drying for the item to release.  Also, that green stuff you see on the tip lasts forever.

TWISTED EASEL BASE:
  1. I did the easel base the same as my tutorial HERE.  As an extra step on this card I trimmed around the rounded corners on the front so they lined up after mounting the cardfront.
Thanks for stopping by to look and share everyone!!


 Shirley

SUPPLIES:

Thursday, November 7, 2013

Snowflake Inspiration


When I saw Jenny Gropp's Snowflake card way back in September I knew I had to try it too.  Had to have that die and this is what I did with it.
CARDFRONT DETAILS:
  1. Embossed Lg. Snowflake die onto a piece of  4.5"4.5" white cardstock.  Next time I'd use 4.75" square.
  2. Used a glue pen to add glitter (starting from the outside first).  The snowflake itself is actually 4 snowflakes.
  3. Mounted pearls with Glossy Accents in my needle nose bottle and QuickStik.  It's really rare if I used the GA bottle to apply it any more.
  4. Mounted bow and used Glossy Accents and a little glitter.
  5. Stamped CAC Ornate Snowflakes, inked with Memento Summer Sky, on white cardstock.  Trimmed it to 5.0"X5.0".
  6. Using Spellbinders Adorning Squares largest die (outside edge) as a stencil, placed in the center of the 5.0" square, traced around it and then used an X-acto knife to cut it out, leaving the frame for the snowflake. (Saved the inside for the inside of the card).
  7. Cut a piece of white "Laid" cardstock 5.25"X5.25".
  8. Mounted the embossed snowflake behind the Ornate Snowflake frame.  Rounded the edges with the punch.
  9. Mounted it to the Laid cardstock and rounded the edges with the punch.
  10. Cut a piece of cardstock 5.25"X10.5", scored length at 5.25", and used Rounder punch on the edges. 
INSIDE CARD:
  1. Adorning Squares and the second largest die cut from Lg. Snowflake were used on the left-hand side.  Pearls and glitter were added as shown.
  2. The right side is the third from the smallest die form Resplendent Rectangles.  It was used as a die and then as a stencil with Magic Matter to get the white area for the stamped sentiment, Most Wonderful Time.
  3. Small Snowflake die set was used for the two snowflakes on the sentiment.  Glitter and pearls were added.
ENVELOPE:
  1. Leftovers from Ornate Snowflake background were used for the strips on the envelope and edges inside the card.
  2. The snowflake is the smallest one from Lg. Snowflake.  Glitter and a heart pearl were added to it.
A fun card!!  One last note.  I have been using a QuickStik lately to mount some of my pearls.  It isn't as sticky as the Sticky Sticks, that just won't let go.  I was surprised to see how easy it was to pick up things and how easy to release when setting the pearl, etc., down on Glossy Accents or glue.

Thanks for stopping by to look and share.


 Shirley

SUPPLIES:

Tuesday, September 10, 2013

Cut-Out Sparkle


A quick card with a bit of whimsy using the Cutout Christmas Tree Die.  I tried a new way of taking the photo to see if I could pick up more sparkle and I think it worked.  I laid the cardfront down flat and took the photo from above, just as I do supplies, etc.  The pearls don't show as white as they truly are though.

CARDFRONT BASE:
  1. Cut cardfront dark green background of 5.25"X5.25", and white dotted swiss at 5"X5" and mounted.
  2. Stamped CAC Mesh Circles with VersaMark on white cardstock, applied stamp and bond powder, heated to a gloss, applied glitter, and heat embossed to seal; trimmed to 5"X5".
  3. Added ribbon to green CS
  4. Die cut Mesh Circles BG with Spellbinders Scalloped Labels One die and mounted frame to cardfront with 3D pop dots..  Saved die cut for inside.


CHRISTMAS TREE CUT-OUT:
  1. Cut clear acetate 3"X4".
  2. Die cut Christmas Tree Cutout and mounted on acetate, trimmed around with scissors.
  3. Added yellow and clear sparkle glitter glue to light and ornament areas.  Next time I would like to try Glossy Accents and glitter for better dimension.
  4. Added Viva Ice White Pearl to the trim area.
  5. Added the flourish to the base and mounted in open area with 3D pop darts.
  6. Added ribbon as shown.
INSIDE LEFT:
  1. Mounted dark green cardstock on die cut left from the cardfront area.
  2. Stamped Peace Hope Joy and Love with Olive Grove on white cardstock die cut and
  3. Mounted inside left at a slant.  Attached a piece of the dark green cardstock.
  4. Added Glossy Accents, white pearl heart, and glitter to bottom of sentiment.
Hope you enjoyed my project.  Thanks for stopping by to look and share.

 Shirley

SUPPLIES:

Tuesday, August 20, 2013

A Quick Card


I just finished this card for my grandson's birthday.  It's later in December.  Here in NC our first snow can happen then, if we are lucky, and Winter Scene reminded me of that.  It was so easy as you can see below!!

 STEPS:
  1. Stamped Winter Scene on Ice Gold Cardstock with Memento Rich Cocoa.
  2. Painted with watercolors and Niji waterbrush.
  3. Added some glitz for snow with glue pen and glitter.
  4. Trimmed to 5.25"X5.25" and mounted to the blue cardstock.
  5. Die cut cardstock for the Anytime Sentiments clear set words.
  6. Stamped the words curving them to fit the die cut with Memento Rich Cocoa.
  7. Mounted on blue cardstock and used Magic Matter to trace around it.
  8. Used two die cut snowflakes from Sm. Snowflake set for ends.  Glued and then added glitter with glue pen.
A quick fun card.  I thought maybe I might not like the brown ink because of the creek, but I really like the look for all of it.  A fading Fall into Winter Scene!!

Thanks for stopping by to look and share.  See you then!

 Shirley

SUPPLIES:

Tuesday, August 13, 2013

Mistletoe Is On Its Way

P1040550


This card was really fast to do: IMAGES:
  1. Stamped Christmas Mousette, Mr. Mouse, Tiny Mistletoe, and Not A Creature Stirring on white cardstock with Memento Rich Cocoa on white cardstock using Mini Mount.
  2. Painted the mice and mistletoe with Twinks, but inkpads or markers can be used too.  Gave Mousette little pearl earrings too!!  Added Flower Soft with Glossy Accents to the mice, added Viva White Pearl and a little glitter to the berries.  Used a small piece of red glitter twine for a bow for the mistletoe.
  3. Used the cling Not A Creature Stirring as a template for tracing around the sentiment after I stamped it, then used the Magic Matter for 1/8" to get the tan matt for around it.  Mounted it to the inside and included left-over background from the Mesh Circles.

P1040553
BACKGROUND:
  1. Stamped CAC Mesh Circles with Memento Desert Sand ink on white cardstock.  Added VersaMark with a dauber to selected circles, added Stamp and Bond Powder, heated to clear, added glitter, heated to set (That's why my pictures are darker.  I wanted the glitter to show).  Alternatives could be glue pen or glitter glue.
  2. Mounted to tan cardstock and added white pearl hearts in corners.
DIES:
  1. Die cut the arch from Arch and Trellis from brown cardstock.  Cut the trellis from light tan cardstock and trimmed to fit doorway to use as a small area rug under mice.  Should have used some ink to make it more distinct I think.
  2. Used the window box die cut twice from brown cardstock for the base board (mop board) on each side of the arch.
ASSEMBLY:
  1. Arch and Rug were mounted with 3D pop dots to background, followed by the mistletoe.
  2. Mice were mounted with 3D pop dots.
  3. Trim mounted to inside and sentiment too.
Hope your week is starting out great and thanks for stopping by to look and share!

 Shirley

SUPPLIES:

Friday, July 26, 2013

Angelic Tree and Snowman


For my card today I chose Alesa Baker's Angelic Tree, Cover-A-Card Dots, and Fir Tree die set.  I think because there is so much glitter, I had a very difficult time getting a good picture.  I created it by:
  1. Stamping the image on white cardstock with Memento London Fog, painted with Memento Cottage Ivy marker, Spica At You Lipstick pen, and Twinkling H2O Warm Pecan.  Used Sakura glue pen for the edges of the snow angels and DecoArt glitter, added bow to tree.  Mounted with 3D pop-dots after the cardfront background was done.
  2. I cheated on the CAC Dots background.  It is a leftover from another project.  It was stamped on white cardstock using VersaMark, Stick and Bond powder applied, heated until glossy, Deco Art Glitter applied, heated to seal.  Die cut and layered as shown.  Leftovers were torn for snow around trees.
  3. Used Spellbinders Labels 8 for the die cuts and as stencils for the white and blue cardstock as shown.
Thanks for stopping by to look and share!!
 Shirley 
SUPPLIES:

Friday, March 30, 2012

Phoebe Butterfly

Hi everybody! It feels wonderful to be back and with a card to show you.  The little lady above was designed for Impression Obsession by Claudia Tenorio-Pearl.  She is called Phoebe and can be purchased in Red Rubber or as a Clear Set with sentiments.  I have the Clear Set.  She is intended to be a Ladybug, but I have chosen to use her as a Butterfly 'Fairy'.  Believe it or not, there are pink butterflies.  I fell in love with her after seeing Julie Koerber's Ladybug HERE.

IMAGE:
I stamped her with Brilliance Galaxy Gold and embossed with a heat gun to dry the ink.  She was painted with Twinkling H20's.  Her eyes and nose were accented with a Script fineline Brown pen.

I chose the largest Spellbinders Labels Twenty-Three die and
  • Used it as a template to determine my 'out of the box' area (leg) and traced with a pencil
  • Cut around her leg as shown, went up past the edge a little on each side of her leg
  • Laid the leg over the edge of the die (so it wouldn't be cut) and put it through the Cuttlebug
  • Turned it over with die in place, used a stylus to emphasize the embossed areas from the back
  • With die was still in place sponged the edges with Brilliance Coffee Bean (after stamping off to make sure it was not too dark) as shown.  
  • Removed the die and inked the outside edges with a Memento Cocoa Brown marker 
  • Outlined the areas where I wanted to emboss with a fine stylus on the front on a Pergamano mat (when you turn it over it looks like a map)
  • Turned her over again and embossed the areas I wanted raised from behind with a bigger stylus
  • Stamped another wing with Brilliance Galaxy Gold, dried with heat gun, and cut out. edged with the Galaxy Gold, turned over and embossed with a larger stylus, mounted it with 3D pop dots as shown.
Embellishments added:
  • Viva Decor Bronze Pearl for her 'butterfly bumps' and antennae
  • Glossy Accents and Deco Art Glamour Dust for her 'fairy spots' on her wings, and
  • Viva Decor Yellow Quartz for the Daisy centers
I used parts of sentiments from both Phoebe and Kate Clear Stamp Sets to get the wording I wanted.  Here is how I did it:
  • From Phoebe, "Sending ladybug hugs", inked bold words
  • From Kate, "Birthday kisses and butterfly wishes", inked bold word
  • Gave me "Sending butterfly hugs".  It was inked with a Memento Cocoa Brown marker
  • Put it through the Cuttlebug with the next to smallest of the same die set
  • Sponged the edges the same as the large die cut and then the outside edges too
  • Added some Glossy Accents with Glamour Dust and Viva Decor Bronze around that in the corner attached with as glue dot.
 BACKGROUND:
  • Mounted Sketchy Flowers on Mega Mount
  • Inked with Brilliance Coffee Bean and stamped on white cardstock.
  • Mounted image near one corner of  stamped background with 5/8 of an inch border on top and left side
  • Used Magic Matter 1/2" disk around entire die cut with image and trimmed
  • Used Magic Matter 1/8" disk around stamped background mounted on Bronze metallic text weight paper and trimmed
  • Mounted image with die cut on top
  • mounted May Arts ribbon as shown
  • Folded 8.5X11" white cardstock in half
  • Mounted image along fold and trimmed around for card
  • Added bow done with Bow-Easy
  • Used leftovers from Bronze metallic and Background cardstock for inside top part of card
Because the card measures 5.5"X4.5" I will need to make an envelope.  I plan on doing a tutorial for the IO blog on Tuesday Tips and Techniques, April 13.  It will show how to make a quick envelope for any size card easily and with a decorative easy liner too.  I am going to be doing the Tips And Techniques portion of the IO blog on the second and fourth Tuesdays of each month.

Hope you liked my card and I can't wait to get around to looking at yours.  It has been a while!!!  See you on your blog....:-)  Thanks for stopping by to look and say hi!!
 Shirley

Supplies:

Sunday, December 4, 2011

CAS That Was Much Fun

I was blog hopping and came across Colleen Dietrich's Pastel Sleigh Ride and knew I had to try something like it!  The sleigh is from Flourishes Sleigh Ride and the Pine boughs are from Impression Obsession's Winter View.  The words are from Flourishes Meet Me Under the Mistletoe.

I stamped the sleigh with Brilliance Galaxy Gold on Neenah Classic Crest Solar White, painted it with Twinkling H2O's, cut it out and embellished it with a punched Paper Shapers Small Snowflake, added Glossy Accents and Deco Art Glamour Dust, then set it aside.

I punched a border on pink parchment paper with a Martha Stewart Around The Page Punch as shown.  I used a Spellbinders Floral Doily Motif die with Neenah Classic Crest Solar White Laid paper.  I cut it in half as shown and mounted it on the pink parchment paper.

Another piece was embossed with one of the folders from Sizzix's Flourish, Dots, and Ribbon set.  A piece of SU DP paper was cut for the background.  The white embossed paper was mounted on that followed by the pink parchment, the die cut, a piece of lace, and then the sleigh.

I stamped the Pine boughs using SU Certainly Celery Classic dye ink on some white CS, cut out, mounted as shown.  Snowflakes were die cut with Cuttlebug's Snowflake #2 die and mounted as shown.  I applied Glossy Accents to all of the centers, added pearl stickers to the centers, then dusted with Deco Arts Glamour Dust.  The ribbon was tied with the Bow-Easy and mounted with a glue-dot.

The base below was done with the same white CS and SU DP stamped with Impression Obsession Winter View Pine boughs and SU Certainly Celery.  A Spellbinders Fancy Tags One die was used for the word base, then the top was stenciled.  The words are from Flourishes Meet Me Under The Mistletoe.  If I made some grammatical mistakes, I apologize.  Somehow tonight I seem to be in a fog.  LOLOL  So if you have questions, please feel free to ask!

I must be doing something wrong with the Inlinkz Link Manager.  I liked it, but it just seemed to take so much time always adding new links.  Oh well, hope your weekend was great and thanks for stopping by to look and share.


 Shirley


Supplies:
Stamps:  Flourishes Sleigh Ride and Meet Me Under The Mistletoe; Impression Obsession Winter View
Paper:  Neenah Classic Crest Solar White and Solar White Laid cardstock; Pink parchment cardstock; Stampin' Up DP remnants
Inks:  Memento - Brilliance Galaxy Gold; Twinkling H2O's; SU Certainly Celery Classic
Accessories:  Paper Shapers Snowflake punch; Spellbinders Tags One, Mark Richards 3mm white pearl stickers; Bow-Easy; Micheal's ribbon, Martha Stewart Around The Page Punches.

Wednesday, July 13, 2011

I Love Mo Channing's Fairies

I have had this this Mo Manning Slightly Chubby Fairy digital image all painted and waiting.  I might also add I am in love with another one of Mo's fairies too (Housework Fairy)!   Did you know you can now get her images in clear and rubber?  They are 'flying off the shelves like hot cakes too'!  I am having a hard time finding them both in one place on-line.  :-)

Soooooo, I printed my fairy that I purchased from Mo Manning.  I painted her with Twinkling H2O's Cherry Sorbet,  Buttercup, Warm Pecan,  Almond Beige, and Solar Gold.  Her wings were done using Glossy Accents applied with the trusty little bottle below:


I have 4 or 5 of these filled with the Glossy Accents, Dimensional Glue, Glitter Glue, and Gesso, etc.  I also keep a fine fine beading needle in case I forget to put the top back on before putting it away, etc.  The tip of the bottle allows me to get right up to the edge of whatever I am doing with it.  When I bought mine I think they were around 2.75 each.  HERE is the most reasonable I could find at a quick look.  If you look for them locally they can be found in wood working shops and places where they sell supplies for tying fly fishing flies.  :-)
After applying the GA I added Deco Art Glamour Dust Crystal Glitter to them and then shook off the extra.  I used Stickles Diamond over the areas I had painted with Solar Gold and then mounted a 2mm pearl with GA on her ear.

The Backgournd DP's are Frances Meyer Pink/White Polka dots and KandCo Garden Medley Embossed papers.

A while back a friend came to stamp and brought her Ellison Clouds Die with some other stuff.   I borrowed it to save the clouds for this card.  Here is what the ones I have look like.  I also used my Magic Matter disk to get the outside rims using the DP I used for the BG frame.  Then I turned them over on a Pergamano/embossing pad and used a stylus to give them depth, then mounted using 1/8" pop dots and leaving room for the ribbon underneath.  I mounted the fairy using 1/16" pop dots.  Michaels organza ribbon was mounted and the bow tied with my Bow-Easy.

The corners were done with the same Glossy Accents Glue Applicator.  Then pushed the peal into it and applied Deco Art Glamour Dust Crystal to it.  Let it set for a minute before shaking it off.  That helps it keep its rim a little better. The heart pearl button in the lower right-hand corner, with the shank removed, was purchased at Hancock Fabrics.

So some credits are due here.  I first fell in love with 'Slightly Chubby Fairy' after seeing it HERE.  I saw the corners done on the same blog HERE.  One very talented lady, Jenny Gropp at One Krafty Kat!!

Thanks for stopping by to look and share.

 Shirley

Saturday, September 4, 2010

A Cute Fall Card! With A Touch Of Halloween


This cute card is 5 3/8X5/3/8" and was created using IO Leigh Hannan's new Tree Owls.  It was stamped on Neenah Solar White Super Smooth cardstock with Brilliance Galaxy Gold and painted with Twinkling H2O's Nutty Oak, Warm Pecan, Ginger Peach, and Daffodil.  The background was done using StazOn Saddle Brown ink with IO Cover-A-Card Maple Leaves on Classic Laid Solar White cardstock (It has a tooth to it that you can see in some of the leaves).  I used a Sakura Quickie Glue Pen for the dots to make the stars, dusted them with Deco Art Glamour Dust.  When dry I painted over the tops and around some with Twinks Daffodil. (Directly below the card above is the bottom of the envelope)

The bow was done using 3 metallic sprays and ivory seam binding.  It was then crumpled up in the corner of a ziplock bag and left over night.  The next day it was released and then a Bow-Easy was used for the double bow as shown.  You can find the instructions HERE.   I love the vintage effect.

All of the punched edges were done using SU Orange cardstock and Martha Stewart's Gothic Arches Corner Punch.  I used Spellbinders Fancy Tags for the greeting. Below is a close up.


Click on the image and you will see the detail in the owls.  Their little eyes were done with Twinks Daffodil and Copic Spica Black glitter pen.  Glossy Accents were applied over them, and I swear they almost look just like real 'Owl Eyes'.  LOL  The heart is from Fancifuls, Inc. online store.  I tied it on with some leftover gold cord.  The pearls are Mark Richards 3mm.  The words are IO Leigh Hannan's Owl Eyes.  Isn't that saying just too cute!

The inside of the card, shown below, was done with a stamped area of the Tree Owls and left over remnants from the Maple Leaves background.  The envelope is handmade from matching Solar White 80lb. text paper.  The flap of the card was done with the same Martha Stewart Gothic Arches corner punch.


 Shirley

Saturday, June 26, 2010

It's Me Again!

Well, I started to design a card and when I got to the Designer Paper I couldn't decide between two, so I did some of each. 

My image is from Stampassions. The designer is Shara Reiner. Isn't it whimsically wonderful. It was stamped with Brilliance Galaxy Gold and I colored it with Twinkling H2O's.  I high lighted the flowers with Glossy Accents and Deco Art Glamour Dust.
(As of the end of June, or by CHA anyway, they are going to be sold now by Creative Imaginations. There are less colors, but they are more vibrant and they are all in different packaging too.) They will be selling some in 5 gram pots with 6 to a set.  There area also some that are different colors in 10 gram pots and sold separately. They will also have the daubers and the sprays too, again in different containers and the sprays do not clog.)  They sent me some samples (LUCKY ME) and I am going to do some projects with them soon.
The image was framed with Bazzill Bling cardstock.  The edge was done with Martha Stewart corner and border punches.  The ribbon is from Michaels and the button is too.   Mark Richards 2mm pearls were used in the holes of the button.  The butterfly is also an MS punch.  I used Glossy Accents on the dots and applied Deco Art Glamour Dust.  What you see next to the card is the envelope.  It was done using a dauber to ink the image and then painted as shown.  Below is what I did with the inside and envelope:
Below is how I did the other card using different DP.  Same color, but different shades of pink and design on the paper too! 
SUPPLIES:
Stamp: Stampassions: Summer Thyme Bouquet by Shara Reiner.
Paper: Neenah Classic Crest Solar White Super Smooth 80lb. cardstock and text weight for the punched edges, Bazzil Bling, Stampin' Up and Anna Griffin.
Inks: Brilliance Galaxy Gold, Twinkling H2O's Cherry Sorbet, Heavenly White, Orange Peel, Dreamsicle, Cool Waters
Accessories: Glossy Accents; Deco Art Glamour Dust; 1/8" pop dots, Heart button, Mark Richards 2mm pearl stickers, Martha Stewart Double Loops Punch Set and EK Success Paper Shaper Butterfly punch.

Well I think that just about covers everything.  I hope your weekend is turning out great and I'll see you back here soon.  Thanks for all of your emails to say hi and for stopping by to look and share.
 Shirley

Thursday, June 24, 2010

Hi Everybody!


Well, I'm baaaaack!  I have been doing cards and cross stitch too, until I broke my left arm.  That's almost behind me and I am so excited to have some cards to show.  For those of you who are still out there, thanks for waiting.

I find that I am really into layering things and not just DP.  Acutally, I love cutting and almost creating a tole look.

I stamped this image on Neenah Solar White cardstock always using Brilliance Galaxy Gold ink. I use this ink like its water.  If you want to know why, look HERE.  The bugs and heart leaves were then stamped again twice.  The Lovebugs on all were painted with Twinkling H2O's Garnet and Olive Vine on all copies.

The scalloped edge around the background copy was done using The Crafter's Workshop 6X6 Template - Stitch Doodle Dot. 

The heart leaves were cut out and mounted on the ground copy using pop dots.  The Love Bugs were then prepared to be mounted.  If you look at each you will see some White Pearl Antennae.  Those are Flower Stamen used by cake decorators.  I bought mine from Golda' Kitchen online.  She had the best selection of sizes and colors too, and shipping was resonable.  I bought micro and small.  You are looking at the micro here.  They were curled around a think croched hook and then mounted to the back using scotch tape.  Then the bug was mounted to the leaves, etc.

The dots on the backs of the Lovebugs were done with Ranger Liquid Pearls White Opal.  I wanted the spots to have diminesion like the pearls, so Rangers Glossy Accents was used first.  Then the sparkles were done by sprinkling lightly with Deco Art Glamour Dust.  All Love Bugs were mounted with Pop Dots.

The ribbon is May Arts, done with the Bow Easy, and mounted with glue dots.  The Stick Pin is from the Making Memories Mistletoe Deco Pins.  A white freshwater pearl and crystal round bead were added too.

The tag is from Spellbinders round die set.  I edged it with Brilliance Galaxy Gold using a Niji Waterbrush, wrote the words with a Galaxy Glitter pen, added some Glossy Accents, and added some of the Glamour Dust to that.  It was moutned with pop dots too.

And that wasn't enough.  I needed the inside for the card and the envy, both shown below.  I actually made the envelope so there would be room for the bow and it wouldn't be smooshed.  I used some Neenah Solar White text weight paper for it.  LOLOL


SUPPLIES:

Stamps:  Impression-Obsession - Love Bugs (Red Rubber Stamp) Can also be purchased in Clear
Paper:  Neenah Classic Crest Solar White Super Smooth 80lb. cardstock,
Inks:  Brilliance Galaxy Gold, Twinkling H2O's Garnet, Olive Vine
Accessories:  Rangers Liquid Pearls White Opal; Glossy Accents; Deco Art Glamour Dust; White Pearl Stamens,  Crafter's Kitchen Stitch Doodle Dot TCW131, Making Memories Mistletoe Deco Pin, white freshwater pearl and clear crystal bead. 1/16" and 1/8" pop dots.

If you have any questions, please feel free to ask.  My email is in the upper left hand corner of the sidebar.  It's great to be back and thanks for stopping by to look and say hi!!!

 Shirley

Monday, December 7, 2009

Late For A Very Important Date

I missed the IO White Challenge because I could not believe how my card looked when I took its picture. It literally made me laugh. Now it is a little better at least and I will share. LOLOL

I embossed the background behind the trees using Cuttlebug's Snowflakes folder.

The foreground is Cover-A-Card Dots. I stamped it on Neenah White cardstock with VersaMark and then applied Heat & Stick Embossing Powder and heated until clear. I added the glitter and heat embossed again. Then I brush the extra glitter off with an art brush.

I also embossed some additional white cardstock using Swiss Dots. I tore it at an angle to get the layered look. Next I used IO Alesa Baker's Clear Stamp Set Swirl Tree to get the outline for the trees. The trees were mounted with 3D pop dots.

I applied glitter to the embossed background and Swiss Dots with a Quickie Glue Pen and added the glitter and then shook off extra.

I punched 1/4" holes with a punch along the top of the card. I threaded the ribbon through the holes as shown and then created a bow with the Bow-Easy. I tied the tail on the right with a slip knot.

Left over buttons were added to the trees and a brass snowflake to the bow. Pearls and glitter were added as shown.

The tag is from Spellbinders and the words were stamped with Galaxy Gold and pearls added as shown.

Supplies:
Stamps: IO Clear Set Swirl Tree and Cover-A-Card Dots used with the Mega Mount
Inks: Brilliance Galaxy Gold,
Paper: Neenah Classic Crest Solar White
Accessories: Cuttlebug Embossing Folders Snowflakes and Swiss Dots, Sakura Quickie Glue Pen, Deco Art Glamour Dust, Mark Richards 3mm and 5mm Pearl stickers, Spellbinders Ribbon Tags Trio, May Arts Ribbon, Bow-Easy, Fancifuls Inc. Brass Snowflake

Thanks for stopping by to look and share.


 Shirley


Tuesday, October 27, 2009

It's A Snow Day!

Another image from last year. I didn't get a chance to use this and couldn't resist it today. I love snowmen and this one is just too too cute!

1. The image, Snow Friends by Lyn Dillin at Inkadinkado, was stamped with Brilliance Galaxy Gold and then painted with Twinkling H2O's. It also comes in a Clear Set, which I didn't know about, ha! The eyes, nose and mount were highlighted with Glossy Accents. The berries and snowflakes were highlighted with Stickles Christmas Red and Diamonds glitter glues.

2. An oval template was used to create the edge for the image. The scalloped embossed die is Bazzill Swiss Dots cardstock used with the largest Spellbinders Large Scalloped Oval die.

3. After the image was mounted on the die cut, marks were where the holes were needed were made with a paper piercer. The smallest eye hole punch from my Silent Setter Hole Punch.

4. The Dotted Swiss ribbon from Michael's was threaded through the holes using a dental floss aid. The bow was made with the Bow-Easy.

5. The edge of the White Plastic disk was done with StazOn Teal Blue. The words stamped on it, with StazOn Blazing Red, are from Impression-Obsession Mini Messages. Gold cord was used to tie it to the oval. Stickles Diamonds was used to highlight here and there.

6. The background is Neenah Classic Crest Solar White embossed with the Snow Dots Cuttlebug embossing folder. That was mounted on Bazzill Dotted Swiss Neptune. A Sakura Quickie Glue Pen was used with DecoArt Glamour Dust Glitter to highlight the middle of snowflakes here and there. The image was mounted using 3D pop dots.

Supplies:

  • Image: Inkadinkado Snow Friends or Clear Set and Impression-Obsession Mini Messages
  • Paper: Neenah Classic Crest Solar White and Bazzill Dotted Swiss Neptune
  • Inks: Brilliance Galaxy Gold, Twinkling H2O's Icicles, Orange Peel, Autumn Skies, Garnet, Solar Gold, Honey Amber, China Black, Cherry Sorbet
  • Accessories: Spellbinders Large Scalloped Ovals, Glossy Accents, Stickles Christmas Red and Diamonds, Cuttlebug Snow Dots embossing folder, Sakura Quickie Glue Pen, DecoArt Glamour Dust Glitter, Michael's Ribbon, Bow-Easy, Gold cord, 1" white plastic disk.

A fun card! Thanks for stopping by the blog to look and share all!


 Shirley


Wednesday, October 21, 2009

No Stamps Here!

I can't remember when I last created a card without any stamps!!! How is it possible to do that? LOLOL. Well, maybe it was last Fall. That's when I last used this embossed image. I had this one left over from last year and said it was time for it to shine!

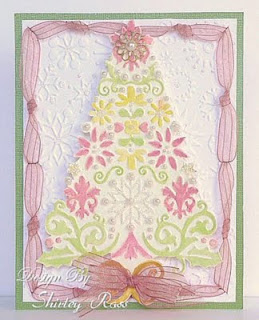
1. The tree image is embossed on Neenah Classic Crest Natural cardstock and painted with the Twinkling H2O's listed below. Then highlights were added with a Sakura Quickie Glue Pen. Mark Richards 2 and 3mm Pearls were added with the help of Glossy Accents. The Gold Flower on the top is from Flourishes Beautiful Brads. I exchanged the brad for the pearl with a glue dot.

2. The Snowflakes are embossed on Neenah Classic Crest Solar White cardstock and highlighted here and there with a Sakura Quickie Glue Pen and DecoArt Glamour Dust. The tree was mounted on top with 3D Pop Dots.

3. The ribbon frame was done using the instructions I found HERE. The bow was done with the Bow-Easy and the extra tails were created by adding an extra piece of ribbon through the back of the bow while it was still on the 'Easy'.

Supplies:
Image: Cuttlebug Lace Tree and Snowflakes embossing folders

Paper: Neenah Classic Crest Solar White and Natural Super Smooth cardstock, Bazzill Bank Roll
Inks: Twinkling H2O's Solar Gold, Pink Grapefruit, Lemon Drop, Kiwi

Accessories: Sakura Quickie Glue Pen, DecoArt Glamour Dust Glitter, Glossy Accents, Mark Richards 2mm and 5mm pearls, Flourishes Beautiful Brads , May Arts Ribbon, Bow-Easy

A quick card. Thanks for stopping by to look and share!


 Shirley


Sunday, September 20, 2009

Alesa Baker Stamps

I have always loved how feminine Alesa Baker stamps are. She also has some fabulous Winter stamps. The card I created today is pretty straight forward. I am still marveling over the Cover-A-Card stamps too as you can see below:


1. My main images area all Alesa Baker at Impression-Obsession:
2. All snow people were stamped with Brilliance Galaxy Gold. The Tree was stamped with Brilliance Pearlescent Ivy.
3. The snow people and trees were painted with Twinkling H2O's.
4. The background with the snow dots is Cover-A-Card CC003 - Dots. They were stamped on Bazzill Bling Glamour using my Mega Mount and Brilliance Moonlight White, immediately Heat & Stick powder applied, heated to gloss and Deco Art Glamour Dust glitter applied, extra poured off. Then heated again and brushed extra glitter away.
5. The bottom portion is Neenah Classic Laid Solar White (it has an embossed look and fee to it) cardstock torn at an angle and then placed on top one another. A Quickie Glue pen was used with more Deco Art Glamour Dust for sparkle on the torn edges here and there. Mark Richard's crystal Red Ruby 2mm Rhinestones were added to the bottom right.
6. Wal-Mart ribbon was added to the tall tree and the snow babies neck as a scarf.
Thanks for stopping by to look and share!


 Shirley


Sunday, February 8, 2009

A "Penfully" Short Project


This was a stamped image I had from last year and since it's almost the end of the Valentine season for this year it seemed appropriate to give it a card!! I am going to be guessing a little on how I did what.

1. The image, Valentine's Stamps by Impression-Obsession was stamped with Brilliance Galaxy Gold on Neenah Classic Crest Solar White Super Smooth cardstock 80lb.

2. It was mounted on Stardream Fairway text weight paper that had been embossed with Cuttlebug Textile Texture folder. One edge was punched with Fiskars Threading Water Border Punch and then every other hole was punched with Fiskars 1/4" Heart Punch.

3. That was mounted on Stardream Chiara Rose Quartz text weight paper.

4. Finally It was painted with Twinkling H2O Solar Gold, various Gelly Roll Stardust Pens. and Gelly Roll Glaze Pens. While parts of the Gelly Roll Glaze pens were wet DecoArt Glamour Dust Crystal glitter was added for highlights. The heart punched areas had Gelly Roll Pink Glaze added and then glitter too while wet. A little Ice Stickles Crystal Ice was added here and there.

5. The last step was to tie buttons I've had forever with Krenik Gold #16 Tapestry Braid cord and then mount them on the corners with medium glue dots.

A whole lotta pen action. Thank you to my friend for letting me post this from her computer. As Deb at Paper, Ink, Scissors and Stamps would say 'Easy Peasy'. Thanks for stopping by 'the blog' to stop and share.


 Shirley


Related Posts Plugin for WordPress, Blogger...