Showing posts with label May Arts. Show all posts

Sunday, June 15, 2014

Something Old And Something New Two


I'm back with the kind of new thing again!  I created the background using a technique from my Online Watercolor Class.  I had the images from an earlier card and just changed them around a little.  Here is how this card was created:

CARDFRONT:
  1. Stamped Rose Pitcher on white cardstock with Brilliance Galaxy Gold, painted with Twinkling H2O's.  The roses and the bud with stem were both stamped 3 more times and painted with twinks.  All were fussy cut, embossed from the back and mounted on the cardfront with 3D pop-dots and w/o on other areas.  The lace tablecloth open areas were cut out with an X-Acto Knife and a healing mat.
  2. The background area was created with CAC Craquelure and Twinkling H2O's using a technique I learned in the Online Watercolor Class series.

 Building Card:
  1. Front -  White Laid cardstock was used for the base.
  2. The Craquelure BG was mounted on that.
  3. The image was mounted on die cuts from Spellbinders Lacey Squares using white and natural cardstock.  It was then mounted on the Craquelure.
  4. Inside - Die Cut edges were mounted with strips of the Craquelure BG.
  5. A small die cut was used for the Rose and a rose with stem was mounted to the right.
  6. Envy - Two of the Lacey Square edges were mounted back to back and a rose with stem added. The lacey edges were peeled to thin before mounting and so was the rose with stem.  I start the separation by flipping the edge back and forth with my X-acto knife, see it starting a little and open it up enough to gently a little at a time holding one side flat or with the free hand.
  7. The bow is May Arts and the heart pen is Maya Roads with a Czech bead added by applying Glossy Accents to the stem.
Off to clean some rain gutters.  LOLOL  No rest for the wicked....or is it the stamping.  ;-)  Thanks for stopping by to  look and share.

 Shirley
SUPPLIES:

Wednesday, May 7, 2014

Sweet Treats For You

IMPRESSION OBSESSION -  SWEET TREATS
IMAGES :
  1. Stamped  image with Golden Glitz three times, painted with twinks, trimmed around base image, embossed from backside with stylus.
  2. Trimmed around needed flowers, etc. on 2nd image as needed to mount on first image.
  3. Trimmed around cupcake for inside and fondant cake for envy.
CARDFRONT AND ENVY:
  1. Card fold - Used Spellbinders Resplendent Rectangles for four die cuts for card as described in Hinged Filigree Card Type 2 Tutorial.  
  2. Cardfront Background - Used the die as a stencil for the cardfront background with some leftover DP; used Tim Holtz Bubble stencil with a dauber and Brilliance ink over the lower right corner of the DP; mounted Sweet Treat image; mounted flowers, cupcake, butterfly cookie, whipped cream with chocolate bits, fondant cake, and bow on cake in window as shown; added sequins on stenciled circles.
  3. Envy - Mounted one leftover corner of DP from stenciled BG to envy; used Pentel eraser refill for dots with Golden Glitz; added fondant cake (separated cardstock to make it thinner); added sequins; mounted (separated) Sweet Treats sign.

INSIDE CARD:
  1. The top and bottom trims were done using the bottom of the largest die.  The inside die cut behind the cupcake was done using a Spellbinders Timeless Rectangles die; sequins were applied and the cupcake was added to the die cut.
EMBELLISHMENTS:
  1. The white cake and cookie frosting is Golden Iridescent Pearl Finish; the Pussy Willows, whipped cream, and candy dots on fondant and cake are Viva Decor Ice White Pearl Pen.
  2. The flower centers are Stickles Orange and Yellow Glitter Glue and Viva Decor Bronze Glitter Glue (which is also the edge of the butterfly, on cookie, wings.
  3. The chocolate bits on the whipped cream are Viva Decor Bronze Pearl Pen.
  4. The bow is May Arts ribbon.
That's enough for everyone, I am sure!!  ;-)   I am off to try and learn how to do things simpler.  ;-)  Thanks for stopping by to look and share!


 Shirley

SUPPLIES:

Sunday, January 12, 2014

Well, It's About Time

Honestly, I had another card I was going to have ready for today, but my daughter asked if I had a sympathy card she could send and I didn't.  I don't send very many, so above is what I created.  As you can see I used Flourishes Winter Blossoms.  Not only did the floral images make it wonderful for this, but it even had one of the sentiments to use as you can see.

CARD BASE:
  1. Used Fancy Ribbon Threader dies to create the white laid die cuts for front and inside.
  2. Cut Base from white cardstock of 8.25"X5.25 and folded.
  3. Blue cardstock for front is 4 1/8"X 4 7/8".  Mounted on front panel and trimmed extra with below off.  Threaded the ribbon.
  4. Mounted the larger white laid die cut to the front panel (leaving the bottom loose to thread the ribbon).  Threaded ribbon.  Made bow and mounted in middle.
  5. Used die for left-hand panel as template and 1/8" magic matter for the blue mat for the white die cut.  Mounted the white die cut leaving the bottom loose to thread the ribbon.  Threaded and tied a flat knot.

IMAGES FOR CARD:
  1. Stamped the images for front and inside twice with Memento Rich Cocoa.  Water colored them, trimmed around them, embossed from the back with stylus on soft mat, mounted images to die cuts.  Trimmed about flowers and mounted using 3D pop-dots.  Used Spica Glitter pens Yellow and Orange for the centers of the flowers.
  2. Stamped sentiment for front on white card stock with the same ink and placed the smaller die over it to trace around it.  Trimmed and placed on blue die cut.  Mounted.
  3. Added 2mm pearls around the outside front and on the sentiment.  Placed a 3mm heart in the center of the front sentiment.  Placed a 5mm heart in the center of the inside left die cuts.
  4. Stamped the images on the envelope and right-hand bottom inside also with the Memento Rich Cocoa.  Painted with twinks as shown.
I still have to add a final sentiment on the inside right and my daughter will let me know about that.

Hope your holidays were great and the weather kinder that it looked from here.  We had in the ones temps and power outage for about 5 hours, which was nothing compared to some of you out there.  Stay warm and safe my stamping friends. Thanks for stopping by to look and share.


 Shirley

SUPPLIES:

Tuesday, September 24, 2013

Winter Mitten


When I saw Snowman Mitten, I immediately thought that stamp needs the 'Kiss' technique with CAC Knit!  That thought led to below:
Cardfront Background:
  1. Stamped CAC Ornate Snowflakes on white cardstock with Memento Summer Sky, trimmed to 4"X5.25" and mounted to white cardstock.
 Kissing Technique:
  1. Inked CAC Knit with Summer Sky ink, placed Snow Mitten on inked CAC and then stamped on white cardstock twice.  Trimmed around first mitten.  Cut out snowman and buttons on second mitten.
  2. Mounted mitten on white cardstock with 3D pop-dots, traced around with Magic Matter 1/8" and cut out.  Mounted buttons with 3D pop-dots.
 Sentiment Snowflake:
  1. What a pleasant surprise when I die cut Lg. Snowflake.  I honestly had no idea this die was actually 4 separate snowflakes if you want.   I saw it embossed by Jenny Gropp HERE, so I thought I would be getting a really detailed one snowflake and instead I got 4 detailed and lovely snowflakes.  You see 2 above and I used the other two for the sentiment on the card as shown.
  2. I stamped the sentiment Happy Holidays on a leftover circle from Circle Shaker Frame Die Set.
Assembly:
  1. Mounted the snowflake on the right first with Glossy Accents, mounted sentiment in the center, then mounted the center small snowflake.  Added glitter with a Sakura glue pen to snowflakes and parts of mitten.
  2. Mounted the circle with sentiment.
  3. Mounted mitten.
  4. Added a bow and heart embellishments.
A really fun card and can't wait to use the leftover snowflakes.  I see a frame with the large one!!!

 Shirley

SUPPLIES:

Saturday, November 24, 2012

IO Online Store Sale And Kind Of New


IO is have a 25% off everything in the store sale until this coming Wednesday.  Go HERE to check out the details.  :-)  Then come on back to check out another remake.

I made a card quite a while ago HERE.  I never did like the way it didn't stand like it should and never used it.  Got it out the other day and here is what did for the reused center and how I mounted it to use this Christmas.  It can be used as a any kind of Christmas season card.

Center Of Card:
  1. Holly Snowflake was stamped with Brilliance Galaxy Gold on Curious Metallic Ice Gold paper and painted with Twinkling H2O's using a Niji Waterbrush. 
  2. The embellishments are Glossy Accents on the holly berries and Mark Richards pink Crystal Sticker Elements in the middle of the image. 
  3. I scored around the edges using my Scor-It. It was mounted on Stardream Chiara Rose Quartz and then Ice Gold again.
  4.  A piece of white card stock was folded to fit behind it.  It opens from the left with room for a message.
  5. The ribbon is by May Arts. The card front was then mounted on Neenah Paper Classic Solar White Super Smooth Cardstock.

Cardfront:
  1. Directly behind the card portion is another piece if Curious Metallic Ice Gold that was enclosed with a piece of Stardream Chiara Rose Quartz.
  2. Before sealing the Rose Quartz I clipped the corners as shown to show the Ice Gold on the tips
  3. Cut another piece of  Rose Quartz 5.25"X5.25".  Used my Scor-It Board to do the embossed frame 3/8" from the edge.
  4. Embossed a piece of Ice Gold with Sizzix Starry Night folder.  Cut it 4.25"X4.25" and mounted to Rose Quartz.
  5. Mounted that on a 5.25"X5.25 piece of white cardstock to give it body.  (Pink and Gold are text weight papers)
  6. Mounted center of card.
  7. Tied a green bow and mounted with glue dot as shown.  Dipped in glitter so it wouldn't stick when card center closed.
I was able to use the same envelope I had for the first card I didn't like.  Very fast and easy the second time around.  ;-)

Hope you all had a safe and great Thanksgiving.  See you back here soon I hope.  Thanks for stopping by to look and share.


 Shirley

SUPPLIES:

Friday, March 30, 2012

Phoebe Butterfly

Hi everybody! It feels wonderful to be back and with a card to show you.  The little lady above was designed for Impression Obsession by Claudia Tenorio-Pearl.  She is called Phoebe and can be purchased in Red Rubber or as a Clear Set with sentiments.  I have the Clear Set.  She is intended to be a Ladybug, but I have chosen to use her as a Butterfly 'Fairy'.  Believe it or not, there are pink butterflies.  I fell in love with her after seeing Julie Koerber's Ladybug HERE.

IMAGE:
I stamped her with Brilliance Galaxy Gold and embossed with a heat gun to dry the ink.  She was painted with Twinkling H20's.  Her eyes and nose were accented with a Script fineline Brown pen.

I chose the largest Spellbinders Labels Twenty-Three die and
  • Used it as a template to determine my 'out of the box' area (leg) and traced with a pencil
  • Cut around her leg as shown, went up past the edge a little on each side of her leg
  • Laid the leg over the edge of the die (so it wouldn't be cut) and put it through the Cuttlebug
  • Turned it over with die in place, used a stylus to emphasize the embossed areas from the back
  • With die was still in place sponged the edges with Brilliance Coffee Bean (after stamping off to make sure it was not too dark) as shown.  
  • Removed the die and inked the outside edges with a Memento Cocoa Brown marker 
  • Outlined the areas where I wanted to emboss with a fine stylus on the front on a Pergamano mat (when you turn it over it looks like a map)
  • Turned her over again and embossed the areas I wanted raised from behind with a bigger stylus
  • Stamped another wing with Brilliance Galaxy Gold, dried with heat gun, and cut out. edged with the Galaxy Gold, turned over and embossed with a larger stylus, mounted it with 3D pop dots as shown.
Embellishments added:
  • Viva Decor Bronze Pearl for her 'butterfly bumps' and antennae
  • Glossy Accents and Deco Art Glamour Dust for her 'fairy spots' on her wings, and
  • Viva Decor Yellow Quartz for the Daisy centers
I used parts of sentiments from both Phoebe and Kate Clear Stamp Sets to get the wording I wanted.  Here is how I did it:
  • From Phoebe, "Sending ladybug hugs", inked bold words
  • From Kate, "Birthday kisses and butterfly wishes", inked bold word
  • Gave me "Sending butterfly hugs".  It was inked with a Memento Cocoa Brown marker
  • Put it through the Cuttlebug with the next to smallest of the same die set
  • Sponged the edges the same as the large die cut and then the outside edges too
  • Added some Glossy Accents with Glamour Dust and Viva Decor Bronze around that in the corner attached with as glue dot.
 BACKGROUND:
  • Mounted Sketchy Flowers on Mega Mount
  • Inked with Brilliance Coffee Bean and stamped on white cardstock.
  • Mounted image near one corner of  stamped background with 5/8 of an inch border on top and left side
  • Used Magic Matter 1/2" disk around entire die cut with image and trimmed
  • Used Magic Matter 1/8" disk around stamped background mounted on Bronze metallic text weight paper and trimmed
  • Mounted image with die cut on top
  • mounted May Arts ribbon as shown
  • Folded 8.5X11" white cardstock in half
  • Mounted image along fold and trimmed around for card
  • Added bow done with Bow-Easy
  • Used leftovers from Bronze metallic and Background cardstock for inside top part of card
Because the card measures 5.5"X4.5" I will need to make an envelope.  I plan on doing a tutorial for the IO blog on Tuesday Tips and Techniques, April 13.  It will show how to make a quick envelope for any size card easily and with a decorative easy liner too.  I am going to be doing the Tips And Techniques portion of the IO blog on the second and fourth Tuesdays of each month.

Hope you liked my card and I can't wait to get around to looking at yours.  It has been a while!!!  See you on your blog....:-)  Thanks for stopping by to look and say hi!!
 Shirley

Supplies:

Tuesday, December 20, 2011

It's Almost Here

And this could be my last post until after Christmas.  It all depends on what I get done.  :-)  This card was done using another Twisted Easel.  It looks like a square easel, but is isn't totally.  If it was a square one it would be 5X5.  I hated seeing the large margin on the right of square easels, so I changed it a little.  The fold for the easel part is the same.  A piece of cardstock cut 5"X10 and folded in the middle for the 5"X5".  Then don't forget top fold the top as from bottom left to right top (to make a triangle).  Look HERE.  Now for the difference.  I made my card front 5.25" and then mounted it so the overhang would be on the right.  Any questions, ask me.

I used Flourishes Poinsettia Boxwood Set for the flowers and the sentiment is from Flourishes Sleigh Ride.  The large flower was stamped twice, cut out, was painted with Twinkling H2O's, bottom and top turned over and embossed on mat with stylus, and layered with 3D pop dots.  3MM Mark Richard pearls were added to the center and Stickles Yellow was added in between them.  The leftover petals from the second Poinsettia were painted with Twinkling H2O's Olive Green and then mounted as shown after the flower was mounted.

The frame for the flower was done using Spellbinders Labels Thirteen.  You can see how I did it HERE.  The white embossed background is Cuttlebug's Kassie's Brocade 5"X7" embossing folder.  Since my card front was 5"X5.25, the next layer is Bazzill's Dotted Swiss Blissful 4.45"X5.0", then Kassie's Brocade at 4.5"X4.75, then Labels Thirteen frame mounted on a white BG, then on Kassie with 3D pop dots, and last the Poinsettia mounted with 3D pop dots.

The layering of the bottom is pretty self explanatory.  I painted the small Poinsettia with the same colors as above.  The pearls are 2MM.  The sentiment was stamped with StazOn Blazing Red and the die from Spellbinders Fancy Tags One was used as a stencil around it.  The die cut was done using more Blissful.  The pearls are 5 and 7MM.  The ribbon is May Arts and done with the Bow-Easy.

I am using the InLinkz Link Manager again.  Some of you said it was helpful.   Hope you enjoyed your visit.  If I don't make it by your blog to say so before Christmas, I hope yours is MERRY and BRIGHT!!  And a very HAPPY NEW YEAR too!!  Thanks for stopping by to look and say hi!!


 Shirley


SUPPLIES:

Saturday, November 5, 2011

It's A Chair Affair!

I know, I have used Impression-Obsession's Fall Serenity image before, but I saw a card HERE, that made me want to use it again!  So this time I stamped the image twice with Stazon-Timber Brown, so I could use one as a base, and painted with Twinkling H2O's Warm Pecan, Buttercup, Dreamsicle, and Ginger Peach.  I always paint with a Niji waterbrush.  (I never spray my pots of color, and I paint directly from the pot.)  I cut both images out.   I turned the painted image over and embossed on a Perganamo embossing mat and embossed with a stylus.  I spot stamped the pumpkin on the chair and the little pumpkin on the floor with a dauber of the Timber Brown.  I painted, cut them out, and embossed them too.

Here was the fun part!  I used my Mega Mount to stamp the upper 'wallpaper' behind the chair with Impression Obsession Cover-A-Card Round Floral, inked with Memento Bamboo Leaves, on SU Saffron cardstock (I think) .   Then I stamped IO Cover-A-Card Wood Grain, inked with Memento Rich Cocoa, on Bazzill Monochromatic Walnut cardstock.

I put a piece of Neenah Classic Crest Solar White 80lb. cardstock and Spellbinders largest Lattice Rectangle die though the Cuttlebug.   I then used the same die as a stencil to get the wallpaper and floor.  I left a space in between as the 'baseboard molding'.  These were mounted to the die cut.

A piece of Bazzill Dotted Swiss Clover Leaf cardstock was mounted on white cardstock as the base.  The die, with wallpaper and floor, were mounted on to that.  I used my retired SU Small Horizontal Slot Punch to be able to place the May Arts ribbon. 

3D pop dots were used to mount the chair with pumpkins.  Next the larger pumpkin on the chair and the smaller one on on the floor, that were separately cut out, were mounted with 3D pop dots.  The ribbon was mounted.  I made the triple bow with my Bow-Easy.  I twisted each bow loop in the opposite direction to get the swirly effect.


The stick pin was created using a Maya Road Trinkit Crystal pin with Czech leaf and faux pearl beads added after adding a dab of Glossy Accents onto the shaft.  The pearls on the chair back and skirt ruffle were added using Viva Decor White Pearls.

I hunted forever to find a post for the really simple easel card fold I used to do this step and found it HERE, using white cardstock.  I layered the bottom portion with the Bazzill Dotted Swiss Clover Leaf cardstock, created wallpaper, and more white cardstock.

The sentiment is computer generated.  I didn't have a stamp I liked and didn't want to shop or wait.  I ran it through the Cuttlebug using a Spellbinders Fancy Tags One die.  Then I used my Magic Matter around the die cut.  Of course, I had to turn it over on the Pergamano embossing mat and use a stylus around these edges too.  The Self-Adhesive Pearl Jewels are some I've had a long time from Oriental Trading Post.

That's it for today and I hope you are having a great weekend!  Thanks for stopping by to look and say hi!!!

 Shirley

SUPPLIES:

Sunday, October 2, 2011

New To You Maybe!

Yesterday was World Cardmaking Day and IO partnered with Operation Write Home for their blog hop.  I featured cards I made for the day.  I made them in a hurry, I might add.  I am going to share them with you here.  I also want you to know IO is offering a $25 Gift Certificate in a drawing.  To be eligible you need to go the the post and comment.  You must comment by 10 pm EST tonight.  You will also find links to Operation Write Home, if you are interested in sending your unused cards to troops in war zones, so they can stay in touch with their loved ones in a special way.  If you are interested, HERE is the link for commenting and the information.  Now for the cards I made:


It is Alesa Baker's Fall Serenity, and it really does remind me of Fall.  It is painted with Twinkling H20's watercolors, as are all of the cards.  It was cut out, turned over on an embossing mat, embossed with a stylus, then mounted on the Spellbinders Lattice Rectangle.  I used Viva White Pearl to accent the chair back.  The ribbon, etc. are remnants.  My inside left panel is "For The Sweetest Pumpkin In The Patch".

My second card reminds me of an old fashioned Thanksgiving.  I used Cover-A-Card Maple Leaves stamped with Memento Cocoa Brown on Neenah Classic Crest Solar White Laid cardstock for the background.   Brown ink was also used for the Gary Robertson's Fall Porch image.  Dark Brown cardstock was used for the Spellbinders Scalloped Edge frame and the cardstock around the Maple Leaves.  The pumpkin, dog and cat, boots, and flowers were cut out, turned over, embossed on an embossing mat with a stylus for depth and then mounted. The inside left panel reads So Very Thankful.

My last card is for Christmas.  I used Hannah Davies's Angel in brown ink.  I cut her out, turned her over on the embossing mat, and used a stylus to give her depth.  She was mounted on Spellbinders Picot Edge Circles, which was mounted on the Score background as shown.  The ribbon is May Arts. The background is Alesa Baker's Score and is in a light blue ink.  Inside the card on the left-hand panel is the sentiment "Enjoy The Magic Of The Holiday Season".

So there you have it.  Thanks for stopping by to look and say hi!  I hope to once again attempt to get caught up on my blog hopping too!

 Shirley

Saturday, September 10, 2011

Back With A Tribute And A Card


Tomorrow is going to be a very sad day for me and I think for most of us.  I will never forget where I was while watching it all happening on TV and getting ready for work on the West coast.  I am in awe of those who survived, both rescuers, victims, and their families too.  I found a widget of the official 9/11 flag and a picture of the beautiful Reflecting Pools built at Ground Zero.  Prayers of energy and peace to the survivors, families, and friends, and to those who have used their time and energy to help and encourage those in need because of this horrendous event.

It's been a while and have I been busy!!   IO is planning a new store website and I have been gathering some information for Mitra.  Also, I have been working on some personal things and my yard.  It was so hot here this summer we were in drought again and I didn't do much.  Now is the time for getting the weeds out and seeding my lawn since it is only in the 80's now.


Now for my offering.  I love this Sweet Violets stamp set by Flourishes, but I had never used it until now.  Well, if you know me, you know I have to layer and emboss for depth, so............

I stamped the image on Neenah Classic Crest Solar White 80lb. cardstock twice using Brilliance Galaxy Gold.   I painted the images with Twinkling H20's Cherry Sorbet and Moss Green using my Niji Waterbrush.  I cut out my base image using my X-Acto knife and painted the edges with the colors of the violets and leaves.  Everything forward has been turned over on an embossing mat and embossed with a stylus.  Next I cut out the leaves on the second image as shown and mounted with 1/16" 3D pop dots.  I did the same with the backs of the flowers, but mounted them using only Glossy Accents.

I ran my new Marianne Die Cutting Frame Swirl 116 through my Cuttlebug using more Neenah Solar White.  The second time through was to emboss the center.  (Hint:  When it doesn't show enough I turn it over with the die in place and use a stylus to accent it more.  I used 1/16" 3D pop dots on the leaves of the Violets and 1/8" 3D pop dots for the flowers.  I put it aside to wait until I had the second die cut.

I put another piece of Neenah Solar White through the Cuttlebug using Spellbinders Curved Rectangles.  The second time was to emboss the center part.  I used the die as a stencil to get the center part using SU DP.  That was mounted to the center of the Solar White die cut with ATG Gold tape.

I removed the backing on the 3D pop dots of the Violets and mounted them and the Marianne die cut to the Curved Rectangle die cut as shown.  I love both these dies!!!!

I cut a piece of the SU DP to 4.25X5.5.  The image and die cuts were mounted to it using 1/16" 3D pop dots.  May Arts ribbon was run under the Marianne die cut for the outside ribbon.  It was run over and under the Marianne die cut for the center piece of ribbon.  My bow was done using the Bow-Easy.  There are 3 rounds of ribbon.  (Hint:  I hate trying to get the bow layers to stay separate and found that if I twist the flip the ends backward they look frilly, so that's what I did.  I like the look.)

The sentiment is from Impression Obsession's Mini Messages clear stamp set and was stamped using Memento Bamboo Green on Neenah.  The smallest Curved Rectangle on SU DP was used for the frame.

The pearls on the corner were purchased on EBay in the nail art section and were cheap and free shipping.  I think they were in Hong Kong.  Incredible!   The pearls on the sentiment are from Mark Richards 3mm pearl stickers.  The heart pearl is Making Memories and the beads are Czech.

That's it for now.  If you ever have any questions, please feel free to ask.  Thanks for stopping by to look and share.

Supplies:
Stamps:  Flourishes Sweet Violets; Impression Obsession Mini Messages
Paper:  Neenah Classic Crest Solar White cardstock and SU DP
Inks:  Memento Bamboo Green; Brilliance Galaxy Gold; Twinkling H2O's Cherry Sorbet and Moss Green
Accessories:  Spellbinders Curved Rectangles, Marianne Die Cutting Frame Swirl 116; Making Memories White Heart Pearl stick pin; Mark Richards 3mm white pearl stickers; Czech pink faceted and pearl beads; Bow-Easy; May Arts ribbon.


 Shirley

Sunday, July 24, 2011

New Flourishes Stamp Set For Me

I purchased two new Flourishes stamp sets, Country Charm Labels and Country Charm Borders (and a few others too), a few months ago and finally made time to use them..  :-)  These are fun stamps!! Above is my result!

I stamped the label and 3 borders with Momento Bamboo Green ink on Neenah Classic Crest Solar White cardstock, painted the little flowers with Twinkling H2O's Cherry Sorbet, using a Niji waterbrush, and cut them out.  One border is for the inside of my card.  I also stamped the envelope bottom with a border too.

I stamped the sentiment, from Impression Obsession's All Occasion I, on the label with Momento Tuxedo Black. flipped it over and embossed the edges on a Pergamano cushion with a stylus.  The white doily die cut is from Martha Stewart Doily Lace Shimmer Die Cuts.  The scalloped edge is from Spellbinder's Scalloped Circles Large cut from Stardream Chiara Rose Quartz text weight paper (a left over and my "GOING GREEN contribution).  The doily was mounted on the scalloped circle.  The label was mounted using 1/16" pop dots on the doily.

A piece of the Neenah Classic Crest Solar White was put through the Cuttlebug using their Victoria embossing folder, and mounted on the Stardream Chiara Rose Quartz.   Two of the border were mounted on top of that as shown.

The main image with label was mounted on top of the background using 1/8" pop dots.   Mark Richards Black Onyx stickers (3mm, 4mm, and 5mm) were mounted as shown.  The Black May Arts Ribbon was placed as shown and the Bow-Easy was used for the bow.  The stick pin is a pearl boutonniere pin with Czech White heart and black onyx faceted beads.

I didn't take pictures of the inside and the envelope with the borders, but the borders were long enough for both.

Last but not least, I am so proud of me.  I finally pulled off making just one card.  You have no idea what a habit it can be to do a certain number each time.  It is so much faster this way and easier to work around doing the IO blog hop and challenge.  Happy camper here!!

Supplies:
Stamps:  Flourishes Country Charm Labels, Country Charm Borders; Impression Obsession All Occasion I.
Paper:  Neenah Classic Crest Solar White cardstock, Stardream Chiara Rose Quartz
Inks:  Momento Bamboo Green, Tuxedo Black;  Twinkling H2O's Cherry Sorbet
Accessories:  Spellbinders Scallop Circles, Martha Stewart Doily Lace Shimmer Die Cuts, Cuttlebug Victoria embossing folder; White Pearl Boutonniere pin; Mark Richards Black Onyx 3, 4, and 5mm stickers; Czech white heart and black onyx faceted beads; Bow-Easy; May Arts ribbon.

Thanks so much for stopping by to look and share everyone!!

 Shirley

Saturday, June 4, 2011

A Tweet Bird And A New List

I'll want to let you know about my new list tab.  With my new blog layout comes TABS.  Love them.  They are taking some of the stuff out of my sidebars and placing it on top where you can see them if you like.  As you can see, I've added 3 more tabs.  I think you can have a total of 7.

The one tab I would like to bring to your attention is the "Any Stamp Challenges".  I have been blog hopping more recently and noticed all of the Rubber Stamp Challenges in Blogland.  :-)  I had someone ask if I knew where there was a list of challenges for 'using any stamp'.  I said no, but I would collect them while hopping.  If you are interested, check the tab.  I was blown away with the ones I have already found.  If you know of any I don't have, let me know and I will put them on the list.  On to my card!!!

I was over at Stephanie Lanzalotto's blog, My Ink Well, and saw her cute Chickadee card!  I didn't have the stamp set she used, but I did have a button I had been wanting to use on a card for some time.

Construction of Bird:

I applied the button to a remnant of white cardstock and drew the legs, tail feathers, and beak with a pencil. I punched out a wing with one of my tear drop punches and then used it to make a larger one with a pencil. Cut it out and used it as a template on some SU DP scraps for the wing and the background for the flowers. Mounted it with a glue dot.  I trimmed around the bird, nose, and legs. Lined them with Viva Black Pearl Pen and applied a generous dot for the bird's eye.  I used the Viva Hematite Glitter Liner to accent some little dots on DP on the Wing.  Set aside to dry.

Stamped on Neenah White Cardstock with Cover-A-Card Swirls and VersaMark pigment ink.  Embossed with Clear EP.  Used Cuttlebug and Spellbinders Lacey Circles Dies for 2 die cuts.  Used larger die as a stencil and brayered with SU Classic Bashful Blue.  Used as stencil again on vellum to put over the Bashful Blue part to later stamp sentiment.  Used smaller die as stencil for background on SU remnant DP and used Viva Hematite Glitter Liner to accent small circles.

Placed larger die over Vellum as stencil, cut out and mounted over center, placed bird near top, stamped sentiment with StazOn near bottom, created Tweet on computer sticker paper, trimmed around, and placed above sentiment, and used Viva Hematite Glitter Liner over all words.

Mounted bird and words in upper left-hand corner with 3D pop dots.  Mounted May Arts ribbon and bow made with Bow-Easy as shown.

Mounted SU DP remnant in center of smaller die cut.  Mounted Prima flowers as shown.  Used Twinkling H2O's True Blue with Niji waterbrush on edges of larger rose.  I wet the edge of petals first with colorless water and Niji.  Then brushed the color lightly onto edges.  It bleeds and blends on the dampened area for a softer natural look.

It needed something else, so I pulled out a Making Memories Blue Heart Stick Pin and threaded it with a Czech jet black onyx bead and a Blue Moon cultured pearl bead from my stash.

Done except for a little of the DP and Cover-A-Card in thin strips inside the card on the top and on the envelope in the lower left-hand corner.

Thanks for stopping by to say hi and look and share!!

 Shirley


Supplies:

Papers: Domtar White, Super Smooth, 90 lb. Folded card base ; SU Bashful Blue/DP remnants; Neenah Classic Crest, Solar White, Super Smooth; Tan or Bone cardstock;Vellum


Stamps: Impression Obsession Cover-A-Card CC002 - Swirls and Damask; Just Rite Friendship Nested Sentiments; Tweet Computer Generated - Flemish Script BT


Inks: StazOn Jet Black; Brilliance Moonlight White;SU Classic Bashful Blue; Twinkling H2O's True Blue


Accessories: Viva Pearl Pen Black and Glitter Liner Hematite; Niji waterbrush 9mm Small; Cuttlebug; Spellbinders Lacey Circles; Prima Innocence (I think!); May Arts Ribbon; Bow-Easy; Czech black faceted bead, Making Memories stick pin, Blue Moon cultured pearl

Thursday, April 7, 2011

IO Encouragement Challenge


When we received our list of upcoming challenges at the end of February, I checked out what encouragement means.  It is anyway you would let someone know you are there for them.  It would be a person needing comfort, someone who is graduating, a friend who is looking for a job, etc. It just so happens I have a friend who just had a disappointment and another young man, graduating from middle school, who is going on his first plane trip for his birthday.  So I thought I would try to do 2 cards using the same layout with different words of "encouragement".

I stamped Leigh Hannan's Watermelon Bugs on Neenah Classic Crest Solar White cardstock 2 times using Stazon Jet Black ink.  I painted them with Twinkling H2O's Garnet and Mallard Green.  I accentuated the heads and bodies with a Spica At You Black pen and then went over the red watermelon and the heads with a Sakura Clear Glaze pen.  Trimmed around the edges as shown.   I embellished it with 2mm pearls mounted with Glossy Accents.

Ran some Neenah Classic Linen Epic Black through my Cuttlebug using Spellbinders Lacey Squares largest die.   Measured the inside of the square and cut Neenah Solar White that I folded for the card.

For the envelopes I used Neenah Classic Crest Solar White Text weight paper, cut 7.25"X7.25", and The Enveloper.  I found it very easy to use.


Next I used an ink dauber and Stazon Jet Black ink on the Watermelon Bug stamp as shown below, for the inside top of the card and the lower left hand corner of the envelope.  I painted the same as the front of the card.  I used a Viva Ice White Pearl Pen to accent around the bugs!

I mounted the ribbons to the card fronts and did the bows with a Bow-Easy.  The red plaid is a left over and the red and black organza is May Arts.  The white acrylic tags are eons old.  I stamped the From the Heart words from Mini Messages with Stazon Blazing Red.   I mounted 3 2mm pearls in the middle of the heart and used Glossy Accents around them and the heart.  I stamped Fly from All Occasion I with Stazon Jet Black and then used Glossy Accents on the words and the 2mm pearls.  They were tied on with gold cord.

So that's my encouragement for this challenge and you can get even more by visiting the IO DT blogs below.  You can now join in the IO challenges for the $25 gift certificate drawing by using Inlinkz.  Also customers will have from the start of the challenge until the Wednesday before DT Thursday (1 week) to enter their card.  More details on the IO blog.
Supplies:

Images: Impression Obsession Leigh Hannan Watermelon Bugs; Clear Stamp Sets All Occasion I and Mini Messages

Paper: Neenah Classic Crest Solar White Super Smooth cardstock and text; Neenah Classic Linen Epic Black
Ink: Stazon Jet Black and Blazing Red; Twinkling H2O's Garnet and Mallard Green
Accessories: Niji Waterbrush, The Enveloper, Cuttlebug, Spellbinders Lacey Squares; 2MM pearls, May Arts ribbon, Bow-Easy, Glossy Accents, Viva Ice White Pearl Pen.

I hope you enjoyed your visit and I should be back soon with more!  Thanks for stopping by to look and share.


 Shirley


Thursday, March 17, 2011

This Is Anything But A Card

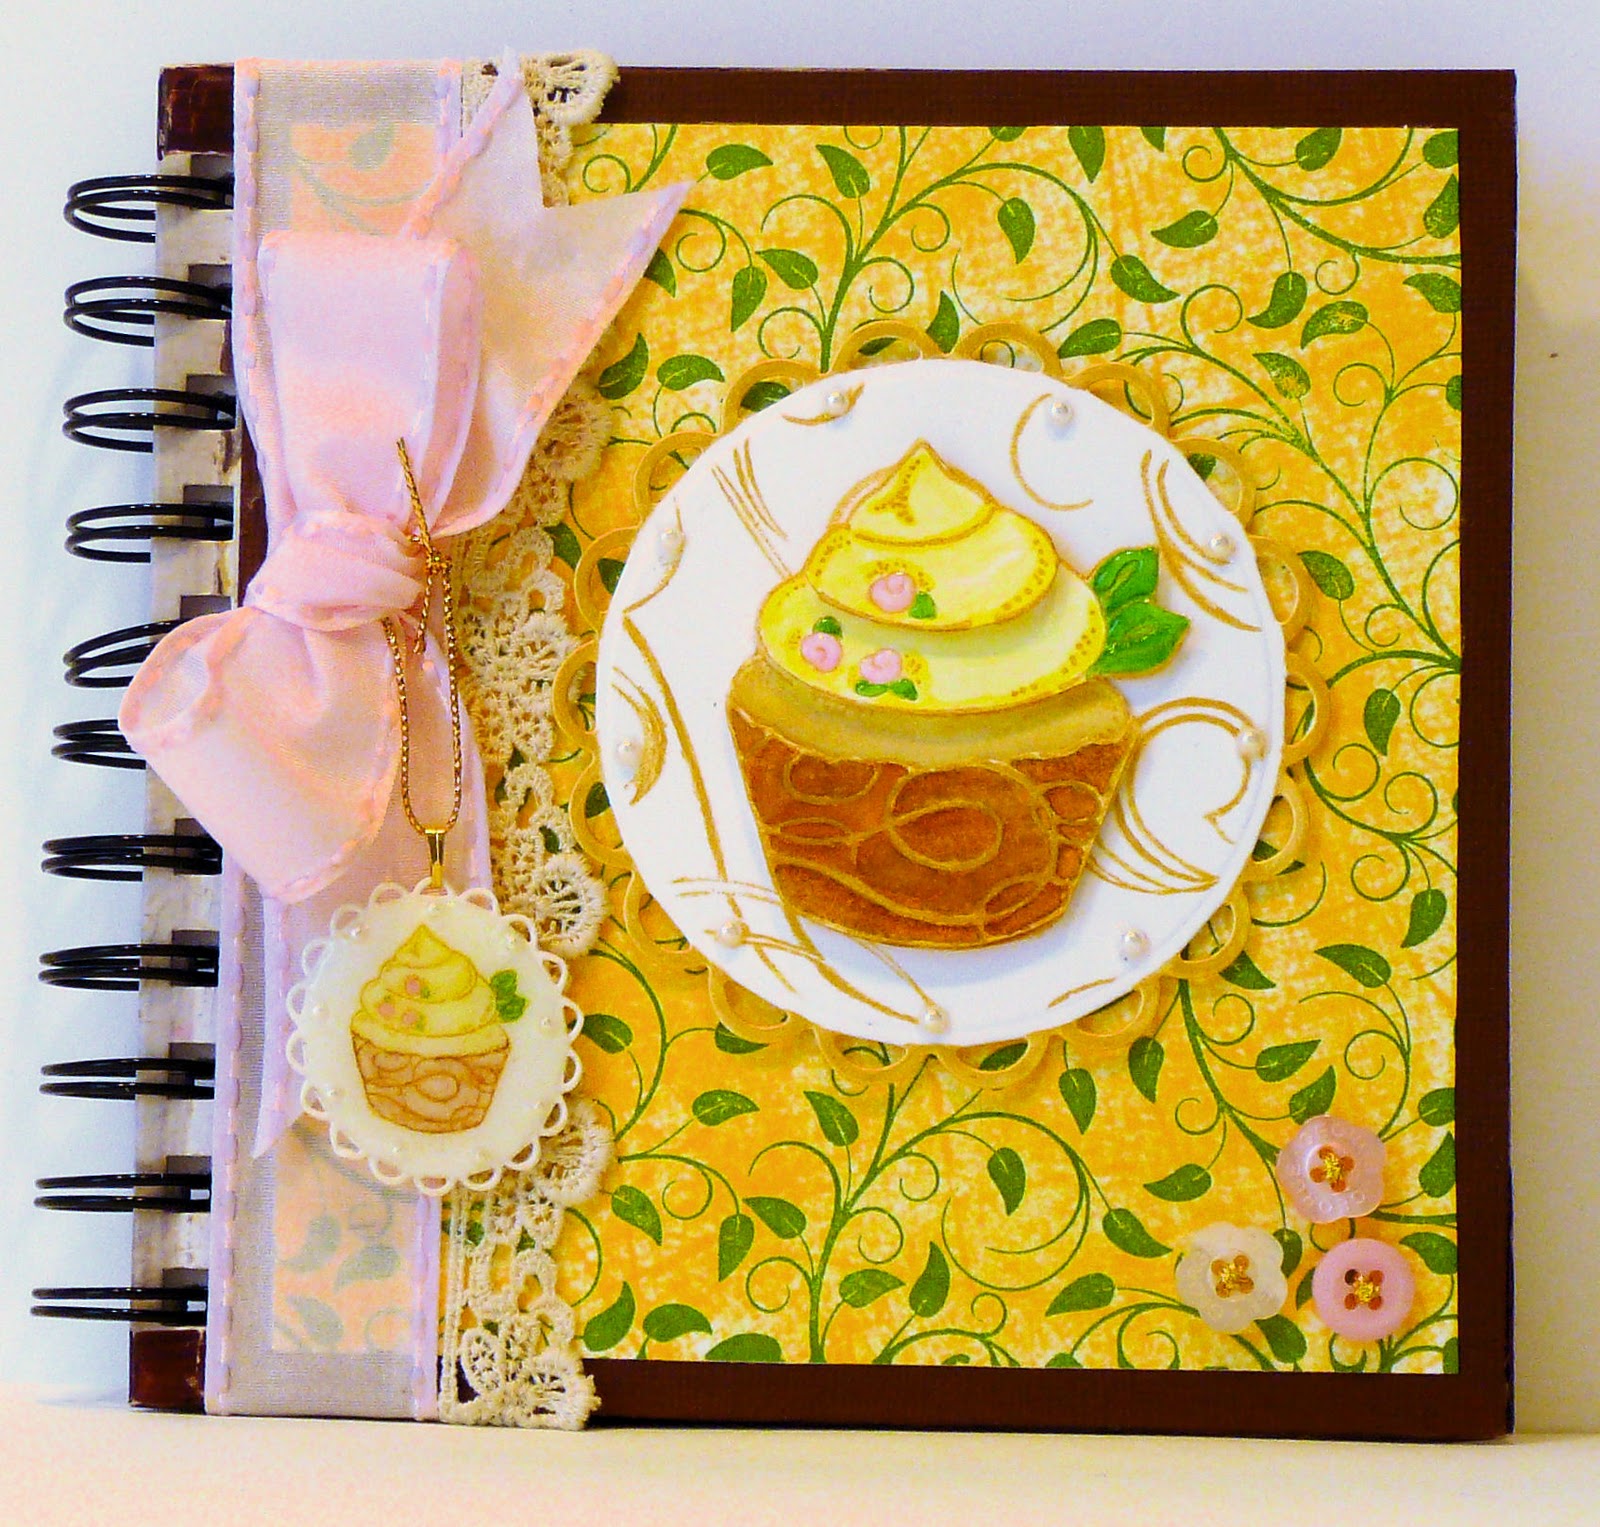
As you can see it really is.  How I got to this point is funny!  My friend is having a birthday and so I wanted to purchase a key chain and make cupcake charm (she loves cupcakes) to go with it.  Well the charm got made and key chain hasn't arrived and so........I know she likes to keep notes, etc., so..........hence the journal or whatever choose to call it!

I used a background I already had done using my Mega MountTM and Cover-A-CardTM Vines inked with Brilliance Thyme.  It was on white cardstock.  I applied an old yellow mustard dye inkpad,  mounted it on a dark brown cardstock, probabaly Bazzil, then mounted those to the front and left inside.  That's the neat part about Cover-A-CardTM. The stamp area is 5.75X5.75 and it fit great here.

I stamped Alesa Baker's  CrÅ me Cup with Brilliance Galaxy Gold 3 times on Neenah Classic Crest Solar White cardstock, painted it with Twinkling H2O's Daffodil, Fern, Golden Sand, and Warm Pecan, cut out the layers, and placed them as shown.  Glossy Accents was added to the rosettes and leaves.

I ran a piece of Neenah Classic Crest Solar White cardstock through the Cuttlebug with Spellbinders Lacey Circles and embossed it.  Leaving the die on the scalloped piece, I stamped it with Cover-A-CardTM Wispy inked with Brilliance Galaxy Gold.  I painted the scallops with Twinkling H2O's Solar Gold.  The image was mounted on the die cut and the 3mm pearls were added with Glossy Accents.

My friend loves big ribbon, so May Arts was taped around the cover and inside and a Bow-Easy bow was added with a little lace, to make it even more feminine.  The die cut image was added, along with some leftover buttons with gold sewing thread.


Next I used a stamp from one of Kalani Allred's new friendship sets, True Blue Friend.  I inked it with Gold Galaxy, stamped it on white cardstock, put it through the Cuttlebug with one of Spellbinders' Fancy Tags, trimmed it down as shown and used 3mm pearls as embellishments for it.


All this because I didn't get a key chain you ask??  LOL  Well, when I did the key chain charm I used the next to largest of Spellbinders Lacey Circles and White Shrink Plastic.  I stamped the front with Galaxy Gold and the same image as above.  Then I used VersaMark on the edges around it so when I heated it with my heat gun it wouldn't stick to itself.  Cleaned off the VersaMark with a soft toothbrush and water, dried it and painted it with Brilliance and Mica Gloss Colors.  I heated them to seal and dry and then I applied 2mm pearls and Glossy Accents as a seal and let that dry.

On the back I used a stamp from another Kalani Allred set, All Occasion I.  You really need to check out all her new phrase sets starting HERE.  You will go crazy, I swear.  One is has such cute and fun phrases that I had to have it, even before knowing how I would use them.

So now that you have seen what  I did, check out what the IO DT members did too!

And don't forget that the IO Blog is now using Inlinkz for people who want to join in the challenges.  Much easier and faster I think.  There will be some more changes for the challenges coming soon too.  We also have the DT doing posts on their blogs in off-challenge Thursdays.  You can check the IO blog on that day to find out who is creating for the day!

Thanks for stopping by to look and share!!  See you soon.

 Shirley

Sunday, March 13, 2011

An Idea That Went The Other Way

And a little bit of everything!!!  I've had this image forever!  I had stamped Magenta's Dasies In A Rectangle on white cardstock with Encore Gold pigment ink and embossed it with gold embossing powder, probably 4 years ago or more.  I had painted it with Radiant Pearls and they had faded over time, like Radiant Pearls can do.  I went through my "saved images" the other day and decided to do something with it.

The embossed area had tuned a little dark like antique gold.  I painted over the ares with Twinkling H2O's Lemon Yellow, Gold Dust, Mallard Green, and China Black.  They really made the flowers pop.  I added Dimensional glue in dots to the centers sprinkles with AIG Old Gold. 

For the background I embossed on Neenah Classic Solar White cardstock with Cuttlebug Love Language folder and on orange cardstock with Sizzix Floral Flourishes and Vines.  I had a card I had done a long time ago that measured 4"X8.5" and I saved some folded blanks I hadn't used.  I punch the top layer with Martha Stewarts Around The Page Eyelet Lace.   I measured, cut, and mounted the backgrounds as shown.

I taped the back of the May Arts ribbon, mounted it over and under the embossed backgrounds, and mounted the bow, done with the Bow-Easy.  The gold flower finding (bought at a stamp convention) on the bow was bent to fit the knot and a 5mm pearl sticker added with some Glossy Accents.

A corner of Neenah Classic Crest Solar White 80lb text was punched with the same corner punch I used for the edge of the card.  The words from Just Rite's Friendship Nested Sentiments were stamped with StazOn Forest Green at an angle to the corner.  A ruler was used to measure where to cut so the punch could be used on the opposite end.  Then the Scor-Pal was used for decorative lines above and below the words.  3mm pearls were added.

Supplies:

Image:  Magenta Daisies In A Rectangle, Just Rite Friendship Nested Sentiments
Paper: Neenah Classic Crest Solar White Super Smooth cardstock and text; orange cardstock
Ink: Encore Gold; Stazon Forest Green; Twinkling H2O's Lemon Yellow, Gold Dust, Mallard Green, China Black
Accessories: Niji Waterbrush, AIG Old Gold glitter, Cuttlebug Love Language embossing folder, Sizzix Floral Flourishes and Vines, Martha Stewart Around The Page Eyelet Lace Punches, 5 and 3MM pearl stickers, May Arts ribbon, Bow-Easy, Brass (Gold) flower finding.

Okay, now I am scared.  I just did spell check and it didn't show me any misspelled words.  I just misspelled on purpose and it didn't catch it.  Oh well, you know what I meant to type!! Yikes!!!  I should be back soon.  This Thursday is IO's "Anything But A Card" challenge.  Thanks for stopping by to look and share. Praying for the Middle East and Japan. :-(  Hope your weekend was good!


 Shirley

Wednesday, February 2, 2011

Is It Spring Yet Challenge


I can't think of more appropriate words, can you?  Yes, "Is It Spring Yet?" is the name of the IO challenge today.  IO is offering a $25 Gift Certificate to be won in a drawing on Friday, 9 p.m., that can be used in their online store.  All you have to do is enter a card following the rules posted in the sidebar at the IO blog site.  You can find them by going HERE!

This was a fairly easy card to create.  All of the stamps are NEW for SPRING, except the Dots.  The NEW STAMPS can be veiwed  HERE.

I created the background using using the Mega MountTM, and Cover-A-CardsTM, Large Dots inked with Memento Dandelion ink, and Wallpaper inked with Mica Gloss Green on White cardstock.  It was mounted on a yellow ochre cardstock. It sure didn't look like that after I took the picture.  LOLOL

IF YOU WOULD LIKE TO SEE THE MEGA MOUNT USED WITH THE LARGE 5.75" STAMPS YOU CAN VIEW IT HERE.  *Note - I happen to stamp on enough cardstock to take the whole stamp.  I like the leftovers for the inside and envelope. etc.

Then I stamped Alesa Baker's Delicate Daffodils on White Cardstock, painted them with Twinkling H2O's, and then I cut them out.

I stamped Alesa Baker's Lovely Tomorrows on White cardstock, used one of my Circle dies by Spellbinders as a stencil, cut it out, and then edged it with the Mica Gloss Green.  I die cut the white Spellbinders pendant and slipped the circle with the words into it.

I mounted the daffodils on the pendant with 3D pop-ups,  mounted the pendant on the background with 3D pop-ups, tied the May Arts bow with the Bow-Easy and mounted it with glue dots, mounted 3mm pearls on the pendant, used gold cord through the heart buttons and mounted with glue dots!  Done

As a finishing touch to the card,  I edged the inside of the card and evelope with remnants from the background.  Then I stamped one of the daffodils inside on the left and on the lower left side of the envelope and painted with the watercolors too.

Now check out the DT members creations on their blogs below for more beautiful cards created with the NEW SPRING stamps too:

Daniela Dobson
Deborah March
Dina Kowal
Jeanne Streiff
Jenny Gropp
Julie Koerber
Kathy Menzies
Laura Fulcher

Supplies:
Image: Impression Obsession - Cover-A-CardTM Large Dots and Wallpaper; Lovely Tomorrows
Paper: Neenah Classic Crest Solar White Super Smooth cardstock, yellow ocher cardstock
Inks: Memento Dandelion, Mica Gloss Green, Twinkling H2O's Dandelion, Sunburst, Buttercup, Warm Pecan
Accessories: Niji Waterbrush, Glossy Accents, Spellbinders Circles and Heart Renaissance Pendant, 3MM pearl stickers, May Arts Ribbon, Bow-Easy, 3 faux mother of pearl heart buttons; gold cord.

I keep hoping I will get caught up enough to start doing some different stamps more often and maybe some tutorials too.  It has been too long.  Thanks for stopping by to look and share all!!

 Shirley

Thursday, January 20, 2011

Well, I'm Back And It's The Color Purple


First let me say all of the images I am using today will be released at CHA on January 29.  Also, when they are available in the on-line store it will be announced on the IO blog.

It's the Impression Obsession Color Purple Challenge!  I stamped the background using Cover-A-CardTM  Heart Swirls  and Memento Grape Jelly ink.  I stamped Leigh Hannan's Cabbage Roses with Gold Galaxy ink and then heat embossed it so it could rise (See my tutorial for emboss without embossing powder in my left side bar).  The Roses were painted with Twinkling H20's Wild Plum and English Lavender. 

I did paper piecing by stamping the image again on white cardstock and went over it with the Heart Swirls.  Then I cut out the pieces and mounted them on the cup and saucer.  I shaded the background with Twinks Olive Green.

I placed one of the Spellbinders Curved Rectangles over the image and marked of what part of the roses I wanted to overlap as shown.  Then I trimmed the roses with scissors across the top, not going past the marked points.  I placed the die over the image making sure the roses were above the die, so they wouldn't be cut when I put it through.  I tuned the image over with the die in place and put it back through to emboss it. I took a piece of the purple cardstock and put it through to cut and then emboss with the same die.  I trimmed around the white die cut at the emboss edge and then mounted it on the purple die cut as shown.  The corner adornments are flattened gold bead caps with 2mm pearls mounted with Glossy accents.

The words are one of Alesa Baker's new stamps A Loving Note.  They were stamped using the Memento Grape Jelly and then mounted using one of the technique with one of the smaller dies from the same set.

The ribbon is May Arts and the pearl heart stick pin is from a Making Memories stash.  The flower finding is a left over from items I bought at a convention.

I mounted the main image using pop dots, followed by the ribbon underneath.  Then I did the Bow-Easy with the bow and mounted it, added the finding with the pearl heart stick pin, followed by the words.........and done with the card front.

I took the left over ends from the Heart Swirls background and lined the inside of the card and left lower hand corner of the envelope.  That's just one of the things I love about the Cover-A-CardTM  background stamps.  Another is that, while using the Mega Mount with them, I have never had a bad impression.  This time I wanted a little aged look, so I took my Niji waterbrush and went over them here and there, blotting after with a Kleenex.


Supplies:

Image: Impression Obsession - Cover-A-CardTM Heart Swirlsnd, Cabbage Roses, and A Loving Note.

Paper: Neenah Classic Crest Solar White Super Smooth cardstock, Purple Cardstock

Inks: Memento Grape Jelly, Brilliance Galaxy Gold, Twinkling H2O's Olive Green, Wild Plum, and English Lavender

Accessories: Niji Waterbrush, Glossy Accents, Spellbinders Mega Curved Rectanglels, 2MM from Hong Kong and 1 5mm pearl sticker, 4 Gold Bead Caps flattened, 1gold random flower finding, May Arts Ribbon, Bow-Easy, Making Memories pearl heart stick pin.

Next you can have some more fun by checking out the IO Blog to see what other stampers are doing to join the challenge and why.  Anyone who emails me a card using at least one IO stamp will have it posted on the IO blog and will also have a chance to win $25 worth of free stamps.   
Don't forget, if you have any questions, you can email me by going to near the top of the left-hand side bar.  I hope you enjoy the cards you find and I hope your week is turning out great.  Thanks for stopping by to look and share everybody!!


 Shirley


Related Posts Plugin for WordPress, Blogger...