Showing posts with label Fiskars. Show all posts

Tuesday, August 21, 2012

Hello Everyone!


I have truly missed being here, but haven't had much time to think about it.  I want to thank all of you for hanging in there with me.  What I have really missed is seeing your blogs and I hope to change that.

Above is just a quick card.  Here is how quick:
  1. I had stamped and painted the Blooming Pansies on Neenah Classic Crest Natural using StazOn Timber Brown.  I couldn't find the stamp on the Penny Black site, but Addicted to Rubber Stamps has it.
  2. I painted it using Twinkling H2O's Dreamsicle, Cherry Sorbet, Buttercup, Lemon Drop, Olive Vine, Golden Bamboo, and Solar Gold. 
  3. The 'Out Of The Box' technique was created by using a Fiskars Oval template.
  4. A piece white piece of cardstock was put through the Cuttlebug using the largest die from Spellbinders Romantic Rectangles.
  5. Impression Obsession CAC Ticking was stamped on Classic Crest Natural using Memento Angel Pink.  CAC Dotty Circles was stamped with SU Craft Whisper White and embossed with Stampendous White embossing powder.
  6. It was cut and mounted on white cardstock.
  7. Green ribbon from Michael's was arranged as shown.
  8. A stick pin was done with a diamante stick pin and a Czech white glass heart bead.
  9. The inside of the card and envelope were done using remnants from the CAC BG and the Apron Lace Border Punch.
  10. The edge of the envy was punched with the same Apron Lace.
Hope to be back soon and thanks again for stopping by to look and share.  Even more I hope I get to blog hop and see yours!!!

 Shirley

SUPPLIES:

Sunday, April 15, 2012

Victorian Fun

I have been dying to get to these stamps.  I love Victorian anything.  Alesa Baker has a lot of new stamps for Spring and here are some of them.  I am afraid I got so into using the stamps I got a little carried away.

I started out:
  • stamping with my Cover-A-Card Screen Stamp onto Neenah Classic Crest Natural cardstock for my background.  Trimmed a piece 4.25"X5.5".  I think any tan or brown colored ink pad would look good.  I used Stampin' Up retired Creamy Caramel. I think Adirondack Caramel will work.
  • Used Cover-A-Card Scratch on Neenah Classic Crest Solar White cardstock.  Trimmed to 3.75"X 5.0". Stamped the Worn Rose image in the upper left corner as shown and painted it with Cherry Sorbet and Olive Green Twinkling H2O's.  Mounted on the Screen cardstock.
  • Stamped Rose Ledger on more Neenah Classic Crest Natural cardstock and painted the bottom with the same Twinks. I trimmed around the edges and top scallops. Mounted on Scratch cardstock.
  • Stamped the inside pages (Worn Rose Vintage Book) for my book and painted with Twinks.  Trimmed and turned over to emboss the floral areas.  
  • Stamped the sentiment, So Glad We're Friends, on the right side. Folded.
  • Stamped the cover for my book, Vintage Worn Rose Cover,  trimmed, painted floral image, turned over and embossed the floral image, and mounted on folded vintage book pages.
  • Punched butterflies with MS 3-in-1 Butterfly punch.  Mounted with Glossy Accents.  Pearls on the butterflies are 2mm from HERE.and were placed with a Sticky Stick and Glossy Accents.  The pearls on the bottom right are probably 3mm and are from Mark Richards Crystal White Pearl stickers.
  •  Ribbon and lace are leftovers from other projects.
  • The ribbon buckle is from Fancifuls.  
Below are photos of what I did for the inside of the card, the envelope, and inside the little book!


The scratch areas on the envelope were done after using a paper crimper to peel the paper apart so it would be thin if I mail the envelope.


I have one request for anyone who knows about blogger and the New Designer Template.  I am having a problem getting rid of the snow.  LOLOLOL  I deleted any widgets that had the code and it hung in there.  I looked all the way through my html layout.  No snow codes there.  Wow!!  This has been a really funny month.

Thanks for stopping by to look and say hi!!That's my card and envy! Hope you liked them. I got to stamp and make up for some of the time when I couldn't. :-)

 Shirley
SUPPLIES:

Tuesday, June 28, 2011

Iris Blooms Floating by Challis & Roo - A Green Card!

First, I would like to report that 2 bloggers have told me that they noticed their Followers were gone and tested my theory. My theory is that by emptying your Google Reader your Followers are somehow connected. Read HERE. They report that the Followers were back after doing that. :-)

I am still using up images I painted this last Winter in an attempt to go 'Green' and not waste! It was kind of fun going through what I have hoarded in backgrounds too.

I created the image by stamping Iris Blooms Floating by Challis & Roos twice using Galaxy Gold on Neenah Classic White Solar Crest cardstock.  I heated it to set and painted with Twinkling H2O's Royal Satin, True Blue, Moss Green, and Olive Green.  Images were trimmed and the edges were painted with Gold Galaxy too.

Two pieces of the Neenah Classic White were run through my Cuttlebug using Spellbinders Labels 13 and repeated to emboss the edges.  One Iris Bloom was mounted onto the embossed die cut with tape, followed by part of the other Iris Blooms and 3D pop dots as shown.  X-Acto knife on a healing mat was used to cut open slots for the ribbon on each side of the die cut. 

I created the back ground when I was doing this card for the Impression Obsessions Blog HERE, if you want to see the tutorial.  So now you know I have had it for almost 2 years. I liked the background so much that I saved 3 more backgrounds to work with later. I used Cover-a-Card™ CC024 Tapestry and CC002 Swirls.

Next I mounted the image with label onto the finished Quilt Background using 3D pop dots.  Michaels ivory colored organza ribbon was threaded through the slots and a double-bow using the Bow-Easy was mounted.  A gold filigree button from my stash was applied with a 5mm pearl sticker and additional Glossy Accents.  I used an acrylic circle and discontinued stamp from Rubber Stamp Tapestry for the tag.  I stamped the image and the edges with Galaxy Gold and heat embossed with Egyptian Gold, and tied it on using left over gold cord.  'Hello' didn't show up well enough, so I went over it with an Olive Green Sharpie.

Thanks so much for stopping by to look and share! 

Supplies:
StampsImpression Obsession Cover-a-Card™  CC024 Tapestry and  CC002 Swirls; Discontinued Iris Blooms, Challis & Roo - Inkadinkado; discontinued stamp from Rubber Stamp Tapestry.
Paper:  Neenah Classic Crest Solar White Super Smooth and Natural cardstock
Inks: VersaMark; Brilliance Galaxy Gold; Twinkling H2O's Royal Satin, True Blue, Moss Green, and Olive Green
Accessories:  Judikins Egyptian Gold Embossing Powder, Spellbinders Frameabilities Scalloped Edges (Flower), Fiskars Apron Lace border punch; Michaels Organdy Ribbon, Bow- EasyMark Richards 5mm, 3mm pearls; Olive Green Sharpie.

Thanks for stopping by to look and share!

 Shirley

Wednesday, June 15, 2011

It's My Flower Time


For months I have wanted to do some flower cards and just never made time.  Well as you can see, I have.  I am starting with a flower I made using Spellbinder's Blossom die set.

The smallest 3 dies from Spellbinder's Blossom set were run through my Cuttlebug twice using Curious Gold Leaf White Gold 8.5X11 text.  It is more of a bone color with a gold sheen to it.  Text is easier to mold and is still thicker than normal text weight paper.  I trimmed the petals in the valleys a little so they would curl easier.  I laid them out and then inked up Impression Obsession's Cover-A-Card Dots on my Mega Mount with Brilliance Coral and rocked it over them and then dried them with a heat gun.  I curled the petals with a crochet handle and mounted them on top one another as shown.   A humongous White pearl sticker was put in the middle and Stickles Cinnamon glitter glue was used for the dots you see around it.  At this point I have one petal layer left for the sentiment.

I ran a pink piece of cardstock through the Cuttlebug using their Textile Texture embossing folder.  I ran my Opalite Golden Mist pad over the embossed area to add a gold sheen to it.   I cut it in half and then taped it to a white piece of Domtar cardstock.

I ran remnant pieces of Neenah Classic Crest Solar White 80lb. text weight paper through my Fiskars Eyelet Lace Border Punch to do 5 layers at 1.5"X4.0".

A remnant piece of dark brown ribbon was threaded through a piece of May Arts lace and taped to the card.  The bow was done with the Bow-Easy.  This was mounted on Curious Chocolate.

The sentiment is from Impression Obsession Clear Stamp Set Mini Messages and was stamped on Neenah Solar White Classic Crest remnant cardstock using Memento Rich Cocoa.  I placed a clear oval sticker on top of it and then taped to center of the last petal die cut and mounted as shown.  Last I used a Viva Decor Cream Pearl Pen to accent certain embossed areas in the paper lace.

I had fun and think I might try a ribbon rose next!  Thanks for stopping by to look and say hi!
 Shirley


Supplies:
Papers: Domtar White, Super Smooth, 90 lb. Folded card base ; Neenah Classic Crest, Solar White, Super Smooth cardstock and text weight; Curious Gold Leaf White Gold and Chocolate text weight; Pink cardstock

Stamps: Impression Obsession Cover-A-Card CC003- Dots and Mini Messages

Inks: Brilliance Coral; Memento Rich Cocoa; Opalite Golden Mist

Accessories: Fiskars Eyelet Lace Border Punch; Viva Pearl Pen Cream; Cuttlebug Textile Texture; Spellbinders Blossom; Mark Richards 10mm Pearl sticker; May Arts Lace; Bow-Easy; Clear Dome sticker, Michael remnant ribbon

Tuesday, November 10, 2009

When It Rains


Plant flowers! So here is my card for today. The image is another one from Hero Arts. It is called Thank You and comes as a cling stamp.

  1. It was stamped with Brillance Galaxy Gold on Neenah Solar White. It was painted with Twinkling H2O's Dreamsicle and Olive Vine. I layered the flowers by stamping just the areas I wanted and then cutting and mounting. The buds on top look like Dew Drops, but are really tiny glass vase gems. You get a huge bag of clear ones for $3-$4. Like the ones HERE. You can used them over color, like I did here, or your can painted them with Sharpies or Alcohol Inks. The bottom left hand buds are Glossy Accents. The middle of the flowers are Mark Richards Pearls.

  2. The next layer down was done using a Neenah Solar White 4.25"X5.5". The left- and right-hand top corners were embossed in the Cuttlebug using Anja Corner Template FE 6124. An Xact0-Knife was used to cut out the areas as shown. Next the bottom was punched using Fiskars All-A-Fleur Border Punch. It embosses a little area above the punched image.

  3. Between the corners and the bottom I used the Dotted Swiss tiny folder from Cuttlebug's Just My Type. It was just a perfect fit as you can see. It was then mounted on SU Almost Apricot I think.

  4. The front was mounted on that and then on a folded piece of Neenah Solar White. The ribbon is from Michael's and tied with the Bow-Easy.

Supplies:

  • Stamp - Hero Arts Thank You - CG115
  • Inks - Brilliance Galaxy Gold, Twinkling H2O's Dreamsicle and Olive Vine
  • Paper - Neenah Classic Crest Solar White and SU Almost Apricot
  • Accessories - Niji Waterbrush, Mark Richards 2 and 5mm pearls, Mini Clear Glass Gems, Anja Corner Template FE 6124, Fiskars All-A-Fleur Border Punch, Michaels Ribbon, Cuttlebug Just My Type Embossing Folders, Bow-Easy

Thanks for stamping by to look and share! I've been out of town and checking to make sure things post on the dates I chose. It's been a little tricky. LOLOL


 Shirley


Monday, October 26, 2009

Fellow Blogger Is A Bad Influence

I try to visit Suzanne's Stamping Place on a regular schedule, but lately it is not always done that way. Whenever I stop by she continues to inspire with her artistic talents. I saw this card on a recent visit and that took me to the Hero Arts online store. LOLOLOL I meant to buy the stamp Sue had used on her card. Well, I did and three more besides. This card shows one of the 'others'.

1. The image was stamped with Brilliance Galaxy Gold. Then areas to be layered were stamped for each layer. They were painted with Twinkling H2O's. The layers were stacked with 3D Pop Dots. Pearls, Rhinestones, and Liquid Pearls White Opal were placed as shown.

2. The side borders were punched using the Sunburst Border Punch. They were attached to each side of the image. The image was mounted on the Bazzill cardstock.

3. The ribbon was attached to the top and bottom. The double bow was done with the Bow-Easy.

Supplies:

Paper: Neenah Classic Crest Solar White and Natural Super Smooth cardstock, Bazzill Orange Peel Red Hot

Inks: Brilliance Galaxy Gold, Twinkling H2O's Garnet, Olive Vine, Lemon Drop,

Accessories: Fiskars Sunburst Border Punch, Sakura Quickie Glue Pen, DecoArt Glamour Dust Glitter, Glossy Accents, Mark Richards 2mm pearls and 2 and 3mm Lavender rhinestones, Liquid Pearls White Opal, Michael's Ribbon, Bow-Easy

A really fun and quick card. If you have any questions, please don't hesitate to ask. Thanks for stopping by to share and look.


 Shirley


Wednesday, September 9, 2009

A Quilter's Card


When I see background stamps or the new IO Cover-a-Cardstamps I immediately think of using them for paper piecing, quilt cards, or ways to show off the great patterns. For today's project I used 2 of the new Cover-a-Card™ stamps for a Quilt card.
I am listing the materials below. If you would like to see the details they are on the IO blog as a tutorial.

Supplies:
Stamps: Cover-a-Card™ CC024 Tapestry and CC002 Swirls

Paper: Neenah Classic Crest Solar White Super Smooth and Natural cardstock, Green cardstock to match the patterned paper.
Inks: VersaMark, Stampin' Up Certainly Celery, Always Artichoke, Handsome Hunter, etc.
Accessories: Egyptian Gold Embossing Powder, Spellbinders Frameabilities Scalloped Edges (Flower), Fiskars Apron Lace Border Punch, Organdy Ribbon, Bow- Easy, Mark Richards 10MM and 5MM pearls.
Thanks for stopping by to look and share!


 Shirley


Tuesday, May 26, 2009

A Different Look And A Party For LumiinArte


The ribbon caused the whole thing. The lighting and the camera really doesn't do it justice. It is so much prettier in person. This is also my card for the Impression-Obsession blog for the week. I am going to list the supplies below, but if you would like to know how I did the punched border and the layering of the flower, shown below, you just need to jump over HERE.
Supplies:
Stamps: Impression-Obsession - Fiesta Flower H2330
Paper: Neenah Classic Crest Solar White Super Smooth cardstock, DCFW Designer Paper
Inks: Brilliance Galaxy Gold, Twinkling H2O's
Accessories: Spellbinders Nestabilities Scallops Large, Fiskars Give It A Swirl Border Punch, Ribbon from Michaels, Bow Easy, Art Institute Glitter Mellow Yellow, Glitter Glue, Sharpie Yellow, Mark Richards 3 and 5MM Pearls.
Here is a quick synopsis if you don't have time. The image is 7 layers. The punched border was done first on other paper to get the measurements. The corners on the DP were punched from the same Fiskars border punch. The ribbon was done with the Bow Easy and I love it.


When you get back you can read about the change of mind by LuninArte, and boy am I glad!!! Here is what the owner sent us in an email on May 23.

From the Desk of Leslie Ohnstad: Thank you for your generosity, kind words of encouragement and prayers. The very unexpected out cry of orders in the past months "globally" has been extremely overwhelming and personally for me a truly humbling experience. The tiny staff of LuminArte Inc. was fully prepared to close at the end of February. Here it is almost the end of May and we are still working hard to fulfill all your requests. I have made the decision that we will not be closing our doors. Your testimonials have touched the hearts of those in our business that, in turn, has made it possible for us to continue to serve you. Thank you so much for caring enough to keep LuminArte's buzz going - positive and alive! Restructuring may take a little while, but it'll be well worth the wait. Soon we'll be featuring a vibrant new website showcasing new products and project ideas.You'll be hearing from us with updates on our fresh and exciting changes. Dreaming In Color, Leslie Blackburn Ohnstad, President/Inventor
  • During the first three weeks of our transition, we will continue offering a 40% off of retail pricing.
  • Midnight June 14th 2009 our prices will return.
  • Discount is taken, at the time your card is charged.
  • Due to overwhelming demand, shipping may take up to 4-6 weeks from date charged.
  • Current orders pending are being produced and shipped as fast as we can get to them.

Hope you can take part in their wonderful prices. I sure have. Thanks for stopping by 'the blog' to look and share.


 Shirley


Wednesday, May 20, 2009

It's A Summer Challenge


For the Impression-Obsession Design Team. As you can see, my card is for those who like the ocean, or the lake, or anywhere there's water! The stamp is Night Pier by Leigh Hannan. I love the water and the sand.

I used Brilliance Galaxy Gold and Twinkling H2O watercolors. The new Moonlight Smooch by ClearSnap was used to highlight some waves. Bet you anything this is Mica Magic Pearl in a different bottle. I used the new Fiskars Effervescence Border Punch for the trim. If you would like to see more detail and how to do the new Fiskars Punch corners, check out the I/O blog, HERE, where I have a video and explain where to mark your punches for the corners.

Don't forget to check out the Design Team member's blogs too for some wonderful cards and don't forget Tina Werner still has Blog Candy to give away!

Thanks for stopping by 'the blog' to look and share.


 Shirley


Tuesday, April 14, 2009

So Glad To Be Back


Every since I saw this card by Linda Duke on Linda's Works Of The Heart blog, I have wanted to do something similar for months. Well, I ordered the Poppy Patch set from Flourishes and there it sat too. Last week I visited Phree at Ink Stain Survivor (she hadn't been around in a while) , saw her 'Shirley Poppies' card and theLight Bulb came on! So now you know where my ideas come from and probably why I only get one or two cards done in a week. Ha! I think I even have some of these flowers in my yard. I never knew there were Shirley Poppies! I built this card from the background up to allow for the punched border first and then all of the materials inside of it.

Card Fold:
1. I cut a bigger card than I would have because punching the border causes a loss of about 1/4" on length and a little less on the width after punching the border. I cut a 5.5"x11" piece of paper. I have 5.5 square envelopes, and needed a little bit smaller card.
2. Using Fiskars Apron Lace Border Punch, I punched the right end, or center piece, of the border first. I knew by looking at my pre-punched sample that I needed to have one complete half-circle on the right and the left ends for the "going around the corner" to work. *After the center part is done I work totally from the back side of the punch (It's turned upside down so you can see the bottom edge of the cardstock to make sure you punch in a straight line. You will know once you try it what I mean.)

3. It was folded so the one punched edge is even with the back right side of the card.

4. I turned the punch to do the sides, starting to create the rounded corner first. I've tried to show that below. If you click on the image below you can see that I've made the second side transparent so you can see what you will be looking at from the back of the punch when you do the left side. Of course you have to imagine the card is everything to your right. If this is confusing for you try either of these two Border Punch Video 1 or this Border Punch Video 2 that might help.

4. Then I measured the inside of the card height and width. I used Neenah Classic Laid Millstone cardstock.

5. For the bottom half I used a piece of double sided sticky sheet half the size of the Millstone, and with tan colored mesh on top.

6. I applied a light blue ribbon from Michael's $1 bin as a seam between the top and the bottom.

7. I applied USArt Quest Mica D'Lites Gold over that for the sticky areas not covered by the mesh.

Ocean View Image:
1. The largest Spellbinders Labels One die was used with Neenah Classic Laid Solar White cardstock in my Cuttlebug.

2. I didn't have any scape stamps for the images and could never make up my mind on which ones to get, so I used Linda's card as a guide and did the rest with Twinkling H2O's and a Niji waterbrush. I also used a little bit of the Gold mica and some Baby Pink Flower Soft.

3. Anna Griffin Cream Designer Paper was used for the outside frame. I put it through the Cuttlebug to emboss only and then trimmed around the double embossed edge.


Flower Images:
1. Stamped with Brilliance Galaxy Gold on Neenah Solar White cardstock and heat set to dry ink.

2. Painted with Twinkling H2O's.

3. Ivory Flower Soft applied to the centers and then a little Twinkling H2O Yellow Drop and a tad of Rangers Stickles Yellow.

4. When dry the images were cut out.

5. The flowers and leaves were mounted with glue and 3D Glue Dots.

6. A light blue ribbon was tied around the flowers.

7. The Sand Dollar is from Fanciful Inc. online.

The colors are really much softer in real life, but this is how the camera saw it to day! Thanks for stopping by 'the blog' to look and share. Hope to be back soon!


 Shirley


Saturday, April 4, 2009

Wordsworth Roses

I wasn't thinking when I bought this stamp. You definitely can't use it on a standard card. It is big. So I paainted it and set it aside until I wanted to do a larger card. That was 3 years ago. LOLOL Finally I said it deserved a home and this is what happened.


Image:

1. The image, Rose Card by Wordsworth, was stamped with Brilliance Galaxy Gold ink on Neenah Solar White Super Smooth cardstock.
2. It was painted with Twinkling H2O's Pink Grapefruit and Olive Vine.
3. I cut the top part of the stamped area, inside the Gold frame, out with an X-acto knife.
Card Folded (4"x8") and Eyelet Edge and Corners:
1. The next part is a little tricky. I had already folded a card that measured 4"x8" for this image when I first stamped it. Why, I can't tell you, but I decided I wanted to have an eyelet punched edge........ Pretend the picture above is the part of the punch you can see to the left of the actual punching mechanism as you would see it without the cardstock in it.
2. I used the Fiskars Eyelet Lace Embossing Punch and found if I laid my cardstock (CS) in the punch with the left edge lined up with the pattern on the left side of the punch where the black line is.
3. Put your CS in the punch, punching the longest side first. Line the left end just past the single eyelet where the black line is. Finish punching clear to the other end.


4. Now your are going to start your ends. Open the folded card and place the CS in with the same side up as before but on the top part of the card.
5. Turn the punch and the CS over so you can see the punching area.
6. Look at the eyelet shape coming up the left side and then look at where I have marked the next one. There are four eyelets because after you line up the two I have marked and when you punch again, there will be the fourth eyelet on the bottom left.
7. After that continue to line up and punch until you have the single eyelet next to the left folded edge of the card.
8. Repeat steps 4. through 7. for the bottom of the card. You might think, why not just punch through both layers. I would almost bet your punch can't do that many layers.

Backgrounds:
1. I used Neenah Solar White Super Smooth CS with the Cuttlebug embossing folder from Love Language and then trimmed to 2.75"x3 1/8".
2. I used an Olive Green paper for the bottom with the Cuttlebug embossing folder Textile Textures and then trimmed to 3 1/8"x3 1/8".
3. I mounted them and then mounted the image. I left the image area without adhesive where the two background papers met so I could bring the ribbon through.

Embellishments:
1. I taped the back of the May Arts ribbon and passed it underneath the roses on the left and over the top on the right. I trimmed the ribbon next to the borders
2. Tied the bow, Martha style, and then mounted it and the button on top with glue dots.
3. Mounted the Mark Richards Crystal Stickers Elements 3mm pearls on the upper left.

Thanks for stopping by the blog to look and share!


 Shirley


Friday, March 6, 2009

Flourish Meets I-O

The main images are from Flourishes Thank You set. The background was done with Impression-Obsession's Large Swirl Background Stamp.

Main Images:
1. The Tulips were stamped on Neenah Classic Crest Solar White Super Smooth 80lb. Cover cardstock with Encore Gold ink.
2. They were heat embossed with Ranger Princess Gold Embossing Powder.
3. They were painted with a Niji waterbrush and Twinkling H2O's Olive Green, Dreamsicle, Lemon Yellow, and Mandarin Citrine.
4. A little Stickles Diamonds was added to the centers of each tulip.
4. They were trimmed with embroidery scissors.

5. The Thank you background was stamped on Neenah Classic Crest Natural Super Smooth 80lb. Cover cardstock with StazOn Timber Brown ink.
6. The background was misted with water and then a Twinkling H2O's Warm Pecan wash was painted over the top.
7. While the paper was still very damp the edges were torn.
8. The same Warm Pecan was used on the edges, only a deeper brown for a deeper aged look.

9. The punched edge was done using a Fiskars All-A-Fleur border punch. First a template was made to check the measurements needed to get the length and width correct. Then a piece of Neenah Classic Crest Solar White Super Smooth 80lb. Cover cardstock was used as shown.
10. The thank you script was mounted and the the flowers were mounted to the left using dimensional dots.
11. 3 Gold (brass) Filigree bead caps, that were flattened by putting them through the Cuttlebug, were placed as faux brads on the corners with glue dots. Mark Richards 5mm Olive Green Crystal Stickers were placed in the center of each flattened bead cap.

Background:
1. The large Swirl Impression-Obsession stamp was inked with VersaMark ink and applied to Glossy White Cardstock.
2. The ink was dried with a heat gun.
3. A layer of Twinkling H2O's Warm Pecan, a little thicker than a wash, was applied over the top and then wiped with a tissue. Who would have thunk orange, huh?
4. That was mounted on Bazzill Bling Blank Check.

The card images were then mounted on the Resist and Bling background and the ribbon, from Michaels, was applied as shown. I usually don't think this, but the picture really doesn't do it justice.

Thanks for stopping by 'the blog' to look and share, and thank you too for your warm words about my new adventure. I will still be here too!


 Shirley


Sunday, February 8, 2009

A "Penfully" Short Project


This was a stamped image I had from last year and since it's almost the end of the Valentine season for this year it seemed appropriate to give it a card!! I am going to be guessing a little on how I did what.

1. The image, Valentine's Stamps by Impression-Obsession was stamped with Brilliance Galaxy Gold on Neenah Classic Crest Solar White Super Smooth cardstock 80lb.

2. It was mounted on Stardream Fairway text weight paper that had been embossed with Cuttlebug Textile Texture folder. One edge was punched with Fiskars Threading Water Border Punch and then every other hole was punched with Fiskars 1/4" Heart Punch.

3. That was mounted on Stardream Chiara Rose Quartz text weight paper.

4. Finally It was painted with Twinkling H2O Solar Gold, various Gelly Roll Stardust Pens. and Gelly Roll Glaze Pens. While parts of the Gelly Roll Glaze pens were wet DecoArt Glamour Dust Crystal glitter was added for highlights. The heart punched areas had Gelly Roll Pink Glaze added and then glitter too while wet. A little Ice Stickles Crystal Ice was added here and there.

5. The last step was to tie buttons I've had forever with Krenik Gold #16 Tapestry Braid cord and then mount them on the corners with medium glue dots.

A whole lotta pen action. Thank you to my friend for letting me post this from her computer. As Deb at Paper, Ink, Scissors and Stamps would say 'Easy Peasy'. Thanks for stopping by 'the blog' to stop and share.


 Shirley


Saturday, January 31, 2009

The Love Bug

For some reason this card did not want to photograph well and it didn't scan well either. After what seem like limitless tries I just went with the last attempt. Ha~!

IMAGE:

1. This cute Love Bug by Peddlers Pack was stamped with Color Box Black pigment ink
2. Heat and Stick Embossing Powder (also called Oh So Sticky Powder, Sticky Powder, Sticky Stuff, etc.) was applied.
3. Heat gun was applied until wet looking
4. Art Institute Black Wing glitter applied
5. (Important Step) Heated again to set the glitter.
6. Brushed again to remove loose Glitter
7. Painted with Twinkling H2O's Garnet using Niji waterbrush
8. White Signo Uniball pen used for eyes and mouth.
9. Cut out image and used Black Sharpie to darken edges.

BACKGROUND:

1. One piece Stardream Metallic Jupiter text weight paper 4.25X5.5".

2. Neenah Classic Crest Solar White Super Smooth 80lb. Cover cardstock run through Cuttlebug using embossing folder from Combo Love Language (1 piece 5.25X4.0) The hearts run vertical.
3. Run the left side of the cardstock through first and then line up the rows of hearts to match the top rows of hearts and put through again. (If you look at the white cardstock above you will know what I mean.)
4. Punch the bottom edge using Fiskars Heart Border Punch by lining up and punching the middle first and then the sides.

5. One piece of Dali Dore SHIMMER Nero 76lb Cover cardstock run through Cuttlebug using embossing folder Mosaic Tiles. If had to do this over, I would have punched the edge and mounted separately with the hearts facing North instead of South as shown.
6. Line up left side of Mosaic Tiles on heart BG where you want path to start and mark with pencil. Line up right side the same way and trim from top left to top right mark and do the same with the bottom of the path using the top trimmed edge as a guide for equal distance from the bottom.
7. Mount to White Heart embossed BG.

8. Mount Love Bug using tape on the feet and Dimensional Glue Dots on the top and antennae.

EMBELLISHMENTS:

1. May Arts String Loop Ribbon applied in upper left and corner taped down with ATG tape. [I don't know if I have ever mentioned this, but I use ATG on everything and buy it from the site I listed. If it won't hold, and that is rare, I use Scotch Quick Dry Tacky Adhesive (picture only). A stamping friend, Carole Miller in MO, told me about this and it never fails with papers.]
2. Tied a bow using the Martha Stewart method.

3. The Stick Pin was created using a JoAnn Sew Essential Pearlized Leaf Straight Pin. It is only found in their stores and not online. The Red Glass Heart and Pearlized bead are Czech beads. it was put though the bow knot before mounting the bow with a glue dot.

4. Love You, Hearts trimmed down, and cursive i in Miss You from Combo Love Language die using Stardream Metallic Jupiter text weight paper applied as shown.

INSIDE CARD AND ENVELOPE:

5. The Double Hearts and the i and u from the Miss You from the Combo Love Language die plate were used on the inside of the card and the envelope. The i and the u were each placed inside each Heart.

Thanks for stopping by 'the blog' to look and share.


 Shirley


Saturday, January 24, 2009

Hugs And Kisses Too!

I've been waiting to use this stamp, Valentine Margarita by Impression-Obsession for almost a year.

1. The image was stamped with Brilliance Galaxy Gold on Neenah Classic Crest Solar White Super Smooth cardstock 80lb.
2. It was painted with Twinkling H2O Garnet and Solar Gold.
3. The glass was emphasized with Glossy Accents.

4. The truffle on the rim was painted with Twinkling H2O's Solar Gold. Stickles Garnet glitter glue was used on the top.

5. The holes for the ribbon were done with an eyelet Silent Setter. The picot ribbon is from Michaels.

6. The Drink Charm was made by using the EK Success Wrought Iron Corner Adorner Slot Punch on Clear Lucky Squirrel Poly Shrink. I added bold lines on the figure below to give you and idea of how it was trimmed after punching was done.
VersaMark was then applied to both sides to keep it from sticking to itself while shrinking using a heat gun. You can't do this if you paint or
color it before shrinking. The paint will run. This technique is also great when working Poly Shrink you are going to stamp while hot to make an impression. I also use a bread loaf non stick pan when shrinking something small like this. Helps keep it in sight....and a wooden skewer also rubbed with VersaMark and placed loosely in one of the holes while it was heated. When done the VersaMark was rubbed off the charm with a baby wipe before doing anything else with it.

7. The charm was painted with a Red Sharpee pen. Two size jump rings were used to hang it from the stem of the glass as shown.


8. The edge punched with the Fiskars Heart Border Punch, done after the image, is another story. If anyone knows of a better way please email me.
-a. Measured the width of the punched area itself from outside edge into the edge of the image and marked it.
-b. Trimmed the cardstock on each side, leaving the bottom and top alone at first.
-c. Centered the punch and punched the 2 hearts in the center.
-d. One heart was punched on each side of them by turning the punch over and lining up on the bottom of the punch.
-e. The top and bottom edge of the image was punched by lining the punch edges up with the two punched edges already there. The the edges were matched by trimming with cuticle scissors to match as well as possible.

9. The image was mounted on Stardream Metallic Jupiter Text weight paper.

10. Neenah Classic Crest Solar White Super Smooth cardstock 80lb. cardstock was run though the Cuttlebug using Floral Fantasy and trimmed down to 4X5.25".
11. It was mounted on another piece of Stardream Metallic Jupiter Text weight paper.
12. The image was mounted on it as shown.
13. Certain areas shown on the embossed Floral Fantasy were painted with Twinkling H2O's Garnet.

14. White Prima Forever Flowers were used on the top and bottom of the cardfront, mounted with glue dots.
15. 3 Hearts were punched from some Stardream Metallic Jupiter Text weight paper using a Fiskars Hand Punch 1/4" Heart. They were mounted in the centers of the flowers and Glossy Accents was added for depth and shine.
16. A glue pen was used on the veins of the petals and DecoArt Glamour Dust Crystal glitter was applied. Then Shimmerz Angel Wings was used to highlight the edges of the petals.

Thanks for stopping by 'the blog' to look and share. Have a great weekend too!


 Shirley


Friday, December 19, 2008

Another Blast From The Past

I stamped and painted this image a couple of years ago. It didn't have the window dressing or the frame. Funny what leaving something alone for a while will do for the imagination. The image is on page 133 at The Artful Stamper. You can order unmounted with cling from them now, but you have to let them know. It's hard to find dealers here in the US who sell their stamps, so the only place I have found online is Stamper's Dream. If she doesn't have unmounted with cling, maybe she will order for you that way.

The image was stamped with Brilliance Galaxy Gold and painted with Twinkling H2O's Douglas Fir, Blue Grass, Moss Green, Garnet, Dreamsicle, Lemon Drop, Egyptian Gold, Caribbean Mist, and Warm Pecan. The candle drips, flames, and berries were accented with Glossy Accents. The Fiskars Rope border punch was used to do the side of the window on the left. Ribbon from Michael's was used to thread through and tie the knots in the punched area. The bow was tied separately and is my favorite Martha Stewart bow technique.

The tag was made using the Spellbinders Oval Scallop Large set (Smallest Scallop die) for the center and then the outline of the die was traced and cut for the border. Mark Richards Crystal Stickers 2 and 3mm Ruby rhinestones were used as shown. The words are from Impression-Obsession Clear Stamps Sentiments I. I have both the I and II. They cover almost any occasion. Gold cord was used to tie the tag to the bow.

Needle piercing was used for the Cross-Stitched edge holes. A Copic At You Spica Gold marker and Gold Gelly Roll Stardust pen were used for the stitches. The brown and the green cardstock for the background mattes were from Strathmore pads I bought on sale at an art store in Reno, NV, where I lived always before moving here 6 years ago.

Thanks for stopping by 'the blog' to look and share! Hope your shopping is done and your holidays are becoming magical!


 Shirley


Wednesday, December 3, 2008

Wow! 2 Cards In A Week


I have really outdone myself! 2 cards within 7 days! Wow! I hope it's a sign of good things to come.

The image, Holly Snowflake by Impression-Obsession, was stamped with Brilliance Galaxy Gold on Neenah Classic Crest Super Smooth Natural 80lb. Cover cardstock. It was heat embossed to dry it and then painted with Twinkling H2O's Rose Petal and Olive Vine. Mark Richards Crystal Stickers 2mm, 3mm, and 5mm pearls were used from the center outward and 2mm Pink rhinestones were used for the Holly Berries. Stickles Rose Quartz (retired) glitter glue was used for the bows. I tried leaving the bows Rose Petal and the whole card just looked blah! Even with Glossy Accents applied. So it had to get some glitter. :-)

The first background is Neenah Classic Crest Super Smooth Natural 80lb. Cover cardstock embossed with Cuttlebug's Textile Texture embossing folder. The ends were punched using Fiskars Holly Border Punch. The punch-out holly leaves were painted with Twinkling H2O Olive Vine and mounted where they came out! Now that is 'Green'. Mark Richards Pink 2mm rhinestones were mounted for the berries. Stickles Rose Quartz was used to highlight the texture randomly.

Stardream Chiara Rose Quartz was used behind that. The ends were first embossed with the Swiss Dot folder from Cuttlebug's A2 Borders Just My Type folder, then punched using the Fiskars Leave It to Weaver Border Punch. The ribbon is from Michaels and was turned half way on each top weave through the punched area.

The very bottom of the Background layers is plain Neenah Classic Crest Super Smooth Natural 80lb. Cover cardstock. It was a very different card and I had no idea where I was going. Ha!

Thanks for stopping by 'the blog' to look and share.


 Shirley


Thursday, November 6, 2008

Parade of Trees #4

I saw this tree on a couple of blogs and just couldn't resist doing it. It is completely folded paper and no stamping at all.

The tree itself is made by doing 2 sheets of Cuttlebug Embossing Folder Snowflakes, cutting them into the squares listed below, edging them with scalloped scissors or cutting them with dies and then folding them. Glue and glitter were then added to the scalloped edges too. The star is a small ornament I bought a long time ago.

The background behind the tree is Cuttlebug Embossing Folder Swiss Dots. The frame around the tree is Cuttlebug Embossing Folder Snowflakes. It is edged in glitter. The blue on the ribbon is a really great match IRL for the Rhinestones, but alas, not in a picture. Ha! Below is a list of sites where you can either watch a video or see tutorials on how to do it:

How to Make an Origami Christmas Tree:
1. Origami Wow Christmas Tree Cards - You Tube Video OR she explains on her blog.
2. Origami Christmas Tree - Card of the Week Video
3. Word Instructions by Kardizzy

The rest of the card was very simple I used the complete 4.25X5.5 piece of Swiss Dots behind the 4.0X5.25 piece of Snowflakes with the oval cut out. The finished cardfront was mounted on a white folded piece of 5.5X8.5 piece of cardstock.

Supplies:

Origami Christmas Tree
:
1 8.5 Neenah Classic Laid Heather Green text or Cover paper (text would be easier to fold)
- 1 3" square sheet of paper
- 1 2.5" square sheet of paper
- 1 2" square sheet of paper
- 1 1.5 square sheet of paper

Background:
- 1 4.0X5.25 Neenah Classic Laid Heather Green text or Cover paper Ridges are imprinted in it
- 2 8.5 X 11 Neenah Paper Classic Crest Solar White Super Smooth 80 lb. cardstock
- 1 Small contraband Christmas tree Star ornament
- Glue pen for around edges of oval frame and edges of scalloped squares.
- Fiskars Small scallop scissors or try Spellbinders squares too.
- Fiskars Oval template, or try Spellbinders Oval
- Mark Richards Crystal Stickers Elements Blue 5mm, 3mm
- Deco Art Glamour Dust Crystal - It looks and acts just like Dazzling Diamonds, but is much cheaper for more.
- May Arts Ribbon

Well, I have another project going, or 2 or 3 or........ Thanks for stopping by 'the blog' to look and share.


 Shirley


Monday, August 25, 2008

Ghosts, Goblins, and Jack-O-Lanterns

Well maybe. When I saw the image below on the Impression-Obsession site it reminded me of a field of flowers with pumpkins, or jack-o-lanterns, as some people call them flying around at Halloween time. You tell me. They don't show up as well in the photo, but the little orange circles have yellow glitter where the eyes would be and then a little black nose. They are meant to be fire flies and I/O even has them in a jar for you. Now for the details. :-)


The stamp is called Summer Fields and was stamped with Brilliance Galaxy Gold on Neenah Classic Crest Solar White Super Smooth 80lb cover cardstock, heat embossed, and then painted with Twinkling H2O's Orange Peel, Fern, Icicles, and Lemon Yell0w. I went over the daisies, jack-o-lanterns, stars, and moon with my Ranger Bullet Perfect Pen, added Clear Embossing Powder and heat embossed. I got this tip from Zindorf's site. She uses a Versamark pen to protect her images. This was done to protect these images when the sky was added.

The sky was created with a sponge and SU Ballet Blue and Brilliant Blue Classic inks. I tried the Zindorf brayer way and it just didn't work for me on this project. I will try it again, but later. :-)

Last Stickles Yellow glitter glue was added to the eyes of the jack-o-lanterns, and the moon. Stickles Diamonds was added to the little flowers below the daisies in the grass, and Stickles Orange Peel was added to the centers of the daisies. The jack-o-lanterns (alias fire flies) were cut around with an X-acto knife and then mounted with a pop-dot to give them the appearance of floating. Eeeeeeeeeerrrrrrie! ;-) Glossy Accents was added to the jack-0-lanterns and the daisies to give them a little lift.

Martha Stewart's Embossed Zig-Zag Border Punch was used for the bottom of a 5X3.75 piece of Neenah Classic Crest Solar White Super Smooth cardstock. One of the borders from the new Cuttlebug folder Border Frills was used on the top. The holes were punched with a 1/8" Fiskars Circle Punch. Then the image was mounted on it. The Cuttlebug border was also done on the blue cardstock and then also punched with the Fiskars circle punch. The image was mounted on that. The ribbon on the white cardstock is from Michaels $1 bin. The cardfront was then mounted on a card of white so the punched circles would show. We all know its a "dotty" world lately, right? If you have any questions I can promise my Email Me on the right side bar does work.

Thanks for stopping by 'the blog' to visit.


 Shirley


Wednesday, August 6, 2008

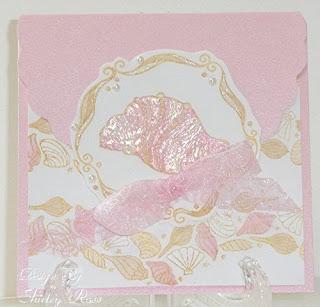
Ocean Shell Flap Card

I have seen so many cute Flap Cards that I just had to try it. Of course, I changed it a little because I wanted a different size that would work well with an A2 envelope, so this card is 4.25X4.25. The direction on putting the card together are directly after this post or you can look under Tutorials for Flap Card in the side bar on the right.

The cardstock, behind the shell image and behind the shells on the cardfront, is actually Stardream Chiara Rose Quartz text weight 80 lb. paper.


The main image on the card flap is Ocean Shell by Impression-Obsession. It was stamped with Brilliance Gold Galaxy on Neenah Classic Crest Solar White Super Smooth cardstock, and painted with Twinks Fuzzy Peach and Icicles. Shimmerz Glue was used to highlight the middle three edges in the middle of the shell. Next Jones Tones Foil glue was applied and let dry until it was clear, but tacky. Jones Tones Foil Pearl Swirl was then applied. To give it the shell shine I used Glossy Accents. I applied Twinks Golden Sand and more Shimmerz Glue to do the waves around the edges. It was cut out and then mounted about half way down and in the middle of the scallops on the Rose Quartz background. I also applied Mark Richards Crystal Stickers Pearls.
For the cardfront that folds up beneath the flap, a 4.25X4.25 piece of Stardream Chiara Rose Quartz paper was mounted. Then the Shell Wave Border by Impression-Obsession was stamped with Brilliance Gold Galaxy on another piece of the Neenah Classic Crest Solar White paper 4.25X5.5. I stamped in the middle first and then in the middle of each side and the middle image. The shells were painted with Twinks Fuzzy Peach, Golden Sand, Icicles, Solar Gold randomly. It was trimmed to 4X4". The extra was saved for inside the card and the envelope. The ribbon is by May Arts.
Inside the card the words were stamped with Brilliance Gold Galaxy and are from Angel Fish set by Impression-Obsession. The I trimmed above and below the words with pieces from the cardfront I did with Shell Wave Border.
This was fun. It shows how I usually build a card. I start with the main image and go from there. More detail how to do the Flap card itself in the post directly after this one. Thanks for stopping by "the blog" to look.


 Shirley


Related Posts Plugin for WordPress, Blogger...