Showing posts with label The Artful Stamper. Show all posts

Tuesday, October 11, 2011

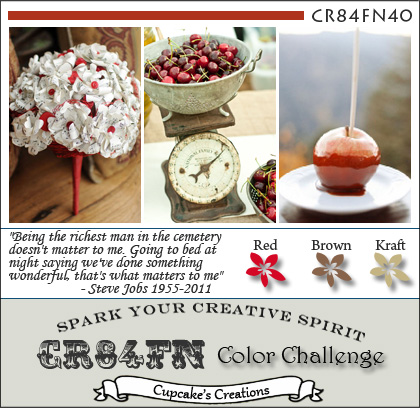
CR84FN40 Color Challenge And Christmas Is Coming


I have modified my post because a friend brought this color challenge to my attention.  When I looked into it, I was inspired when I saw the dedication.  This Color Challenge CR84FN40  is dedicated to Steve Jobs.  The challenge owner and administrator is Mona Pendleton and her husband, Scott, is a HUGE fan and chose a quote made by Steve himself to inspire all of us. R.I.P. Steve and Thank You for the difference you have made in all of our lives!

If any of you heard the speech that Steve Jobs gave as the commencement speaker in 2005 to Stanford University, you know just how special he was and what he did with life's challenges.  I wish I could have heard it 40 years ago.  He would have been 16 years old then.  :-)  You will find it HERE.

I have never ever done a challenge before, so this is a new experience.  I hope I do it right!!! LOLOL


And it's about time I got started with my cards.   I stamped The Artful Stamper fawn with Copper pigment ink (Challenge Color BROWN) on Neenah Classic Crest Solar White Super Smooth 80lb. cardstock, applied Copper embossing powder, and heated to set.  I couldn't find the image on their site and have asked them to send me the link.  The image was painted with Twinkling H2O'sStickles Diamonds and Glossy Accents were used to highlight the snowflakes and berries.  The spots on the fawn were done with Viva Decor Ice White Pearl.

I used Spellbinders Curved Rectangles for the shape around the fawn.  I put copper toned cardstock through the Cuttlebug and then, using the same die as a stencil for the fawn, mounted it on the die cut.

The background was created by applying SU Creamy Caramel Classic ink (Challenge Color KRAFT)  to Impression Obsession's Cover-A-Card Paisley Crystal mounted on my Mega Mount, then stamping on Neenah Classic Crest Solar White Super Smooth 80lb. cardstock.  Another piece of the copper toned cardstock was put though the Cuttlebug using the largest die.  The Paisley Crystal BG was mounted on top and the red ribbon (from Michaels) (Challenge Color RED) was added.

That was mounted over a piece of folded 6.25"X12" Neenah Classic Crest Solar White Super Smooth 80lb. cardstock and used as stencil to create the card.  The image was mounted on top with 3D pop dots.  The bow was tied with the Bow-Easy and mounted.  The snowflake die cuts are from Cuttlebug's Snowflake #2 and the cardstock is Arrio Wiggins Curious Ice Gold.  I used Mark Richards 5mm pearl stickers for the centers of the snowflakes.  The tag is Spellbinders Ribbons Tag Trio, also cut from Curious Ice Gold.  The sentiment was done with Brilliance Rocket Red and Impression Obsession Sentiments I.

The stick pin was done with a Maya Road Trinket Heart pin and adding a Czech bicone crystal bead and a copper bead brought back to me from France by a friend, who is also a stampaholic (thank you LaVerne).  They are truly beautiful and shine to no end.  I added a little Glossy Accent above each bead on the pin before pushing them up next to the heart.  It dries really fast and then they don't slide around on the stick pin.


The inside and the envelope images were done by stamping onto Neenah Classic Crest Solar White Text, trimming around them and then mounting on to the cardstock on more text paper, which is what I used to make my envelope.  Yes, I made the envelope and it is really easy to do, but that's another story for another day.

 Shirley

SUPPLIES:


Saturday, January 17, 2009

Is It Spring Yet?!!!!!

This image is Filigree Butterfly from The Artful Stamper. I actually stamped it using one from a Technique Junkie friend who was visiting to stamp with me. Thank you Barbara.

1. The image was stamped using Brilliance Galaxy Gold on Neenah Classic Crest Natural Super Smooth cardstock 80lb.
2. It was painted with Twinkling H2O's Meridian Blue, True Blue,
3. The stems of the flower were done with Twinkling H2O's Green Tea.
4. The Black outline was done with Black/Silver glitter glue.
5. The tail and antennae were done with a Copic Spica At You Black Glitter Pen.
6. The petals of the flower were done with Shimmerz Bubble Gum.
7. The centers of the flower are Mark Richards Crystal Stickers Elements 2mm Yellow.
8. The spots on the Butterfly and around the flowers were done with Liquid Pearls White Opal.

9. The edges were done with Wedges cut from Matte board purchased from Hobby Lobby was used to make an angle. Two layers of the Matte board were required to get the right thickness like the B plate. It was used separately on each side of the Cuttlebug Textile Texture embossing folder where embossing was required. You can see that only 3 corners required embossing.

10. The cardstock for under the image is Hunter Green by SU. The edges were first rubbed on aVersamark Dazzle Champagne ink pad. A heat gun was used to dry the ink. It gave the edges a Goldish Green cast like the Green Tea on the vines of the flowers. The image was mounted on it.

11. A Martha Stewart Ribbon Punch was used on the left side. Pink Ribbon from Michaels was threaded through the slots and a Martha Stewart bow was tied and mounted on that as shown.

12. The word label was done using the inside and outside rim of an oval vellum tag. Identical cardstock was used for it. Mark Richards 3mm pearls were mounted on the ends.

A relatively simple card once the image was done! Thanks for stopping by 'the blog' to look and share. I am so glad I finally got to post a card. There should be another one soon.


 Shirley


Friday, December 19, 2008

Another Blast From The Past

I stamped and painted this image a couple of years ago. It didn't have the window dressing or the frame. Funny what leaving something alone for a while will do for the imagination. The image is on page 133 at The Artful Stamper. You can order unmounted with cling from them now, but you have to let them know. It's hard to find dealers here in the US who sell their stamps, so the only place I have found online is Stamper's Dream. If she doesn't have unmounted with cling, maybe she will order for you that way.

The image was stamped with Brilliance Galaxy Gold and painted with Twinkling H2O's Douglas Fir, Blue Grass, Moss Green, Garnet, Dreamsicle, Lemon Drop, Egyptian Gold, Caribbean Mist, and Warm Pecan. The candle drips, flames, and berries were accented with Glossy Accents. The Fiskars Rope border punch was used to do the side of the window on the left. Ribbon from Michael's was used to thread through and tie the knots in the punched area. The bow was tied separately and is my favorite Martha Stewart bow technique.

The tag was made using the Spellbinders Oval Scallop Large set (Smallest Scallop die) for the center and then the outline of the die was traced and cut for the border. Mark Richards Crystal Stickers 2 and 3mm Ruby rhinestones were used as shown. The words are from Impression-Obsession Clear Stamps Sentiments I. I have both the I and II. They cover almost any occasion. Gold cord was used to tie the tag to the bow.

Needle piercing was used for the Cross-Stitched edge holes. A Copic At You Spica Gold marker and Gold Gelly Roll Stardust pen were used for the stitches. The brown and the green cardstock for the background mattes were from Strathmore pads I bought on sale at an art store in Reno, NV, where I lived always before moving here 6 years ago.

Thanks for stopping by 'the blog' to look and share! Hope your shopping is done and your holidays are becoming magical!


 Shirley


Related Posts Plugin for WordPress, Blogger...